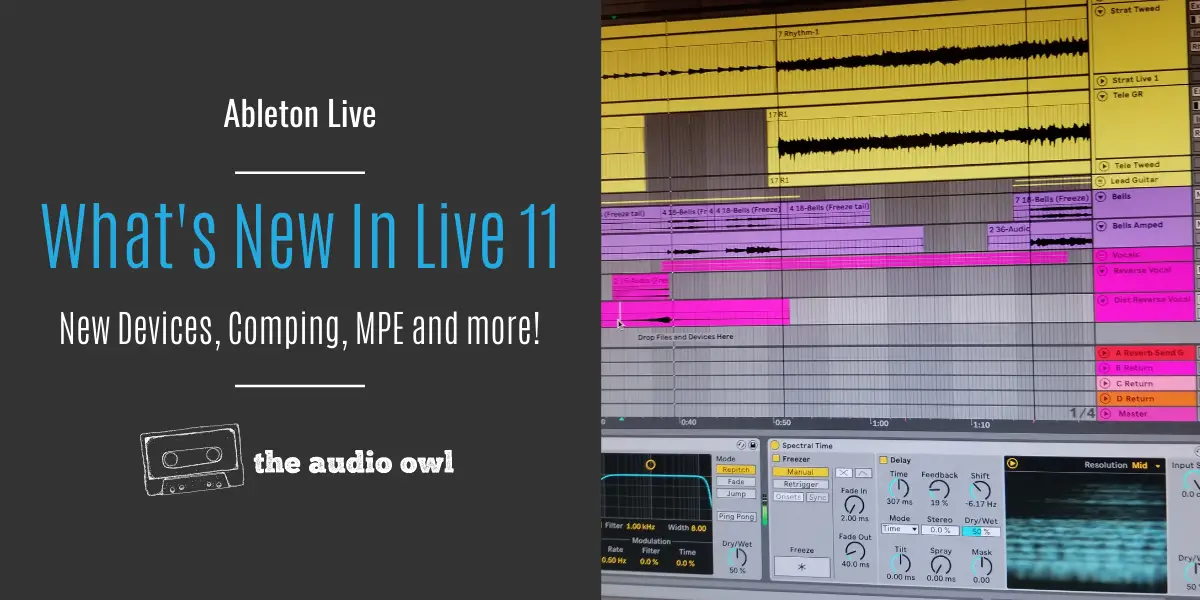
Ableton Live 11 is the new release of the outstanding and awesome DAW Ableton (bias we know!). The music production software was released on February 23, 2021, and is jam-packed with awesome new devices and features.
Let’s take a gander at the new features, shall we?
Comping
Comping is the process of recording multiple performances and then taking the best parts from each recording to create your final edit. This is used most frequently while recording vocals.
This feature is now part of Ableton Live 11 and will help you organize your recording takes in one easily manageable track.
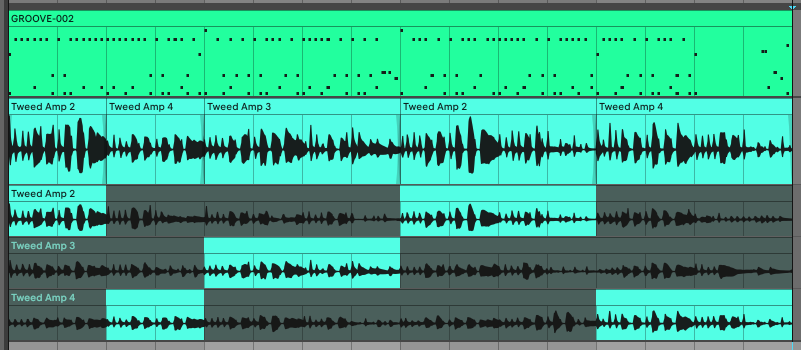
To use comping, highlight the selection of your song you want to record. Once selected, click the loop button so the section plays over and over again. When you are ready, start recording. Record your part over and over again along with the loop.
Take Lanes
When you are done recording, right click on the track name and select “Show Take Lanes”.
This will break out your track and give each cycle through the loop its own track lane.
You can select a section from a lane by highlighting the part you want and pressing the enter key. You can also use the pencil tool to select the parts you want to use.
Midi Comping
Comping works with recording MIDI as well. Follow the same steps as above while recording MIDI takes.
Crossfade Comping
Now that you have your perfect take put together, you may notice some clicks when switching from clip to clip. This can be remedied by right clicking on any of the clips in your comping track and selecting “Create Crossfades on Clip Edges”.
Now your clips will transition smoothly without any clicks.
New Devices
Ableton Live 11 comes with a few new devices to experiment with. A new reverb, a spectral resonator, and a spectral delay device.
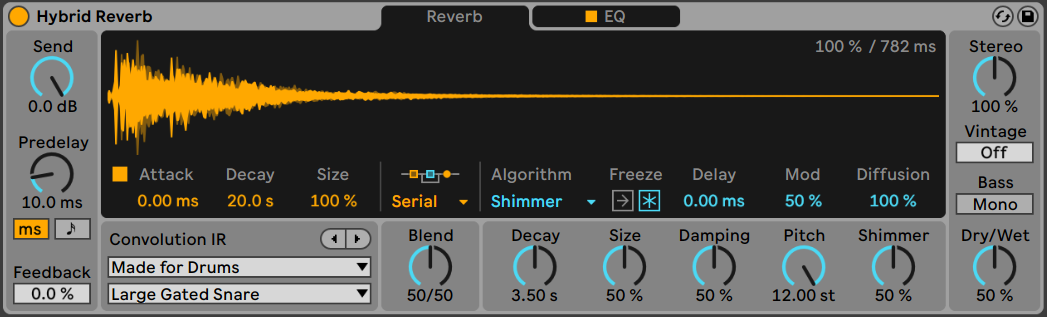
Hybrid Reverb
The new Hybrid Reverb device combines both convolution and algorithmic reverbs. You can mix between the two with the blend knob and even play them in serial or parallel.
On the convolution side, you can drop any sample into the sample window to use as an IR sample.
On the algorithmic side, you can choose from many different reverb algorithms.
There is also an onboard EQ in Hybrid Reverb, this allows you to apply EQ to the reverb only without having to add a Reverb device and an EQ device to an audio effects rack.
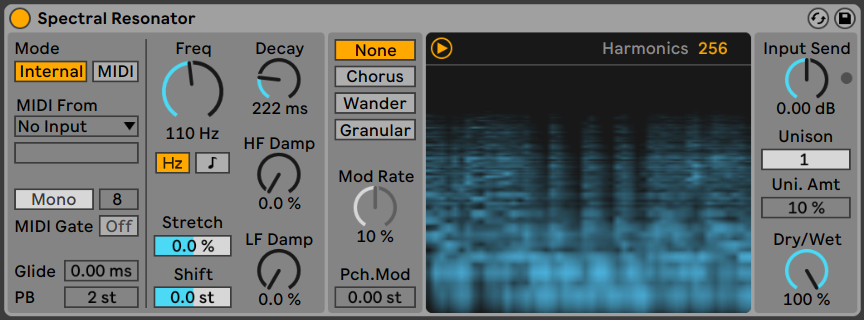
Spectral Resonator
The Spectral Resonator device works similarly to a vocoder. You can feed the resonator and input signal and use it to make a vocal or other sound sing the notes of the input signal.
When you are not using an input signal, you can select a static tone to use as the main resonant frequency.
Spectral Time
Spectral Time works as a delay/reverb but sounds incredibly unique. The new spectral device works by delaying frequencies at a different rate creating almost a spraying sound.
This new Spectral delay comes with some standard delay parameters, but the fun kicks in when using the Tilt, Spray, and Mask knobs.
Using the default parameters sounds kind of like a normal delay. Using the tilt knob will start to set each frequency band at a different rate. The spray knob blurs each frequency band together to smooth out the delay.

Updated Devices
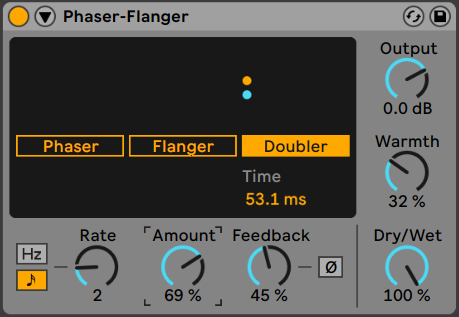
Ableton has updated a few of their devices as well. They combined the Phaser and Flanger plugins and added some helpful visuals to help you visualize what the effect is doing.
Phaser-Flanger
The Phaser part of this device now offers up to 42 notches! That kind of seems a little excessive but hey, it’s still pretty cool. You can change the spread of the notches and adjust the centre notch as well.
The Flanger and Doubler are essentially the same device. Doubler allows for delay times higher than 20ms while Flanger allows for delay times below 20ms.
The device also has a warmth parameter which adds a little bit of saturation to the effect.
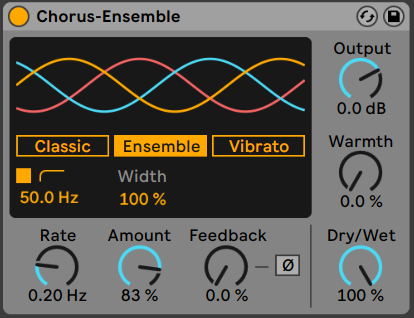
Chorus-Ensemble
The Chorus device has also been updated and is now called Chorus-Ensemble. There are three modes to the new Chorus device; Classic mode, Ensemble Mode, and Vibrato mode.
Ensemble mode is basically the classic chorus with a third channel of chorusing.
The vibrato section can be used to add vibrato to any plugin instrument or audio clip. This can be extremely helpful if the instrument you are using does not have a vibrato parameter.
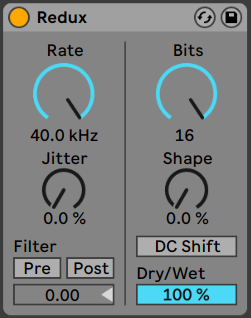
Redux
Redux has been improved to allow more control over the bitcrushing effect. The best new addition to this device is the Dry/Wet knob which was desperately needed.
The new Jitter control adds randomness to the downsampling process. There is also a filter section included in the device which can be set either before or after the downsampling.
Rack Macro Improvements
Ableton has greatly improved how the audio, MIDI, and instrument racks work. Macros now give users more control than ever before.
You can now have up to 16 macros in any Ableton effects rack and you can choose how many macros to display in the device view. To set the number of visible macros, simply click on the + or – buttons to the left of the device view.
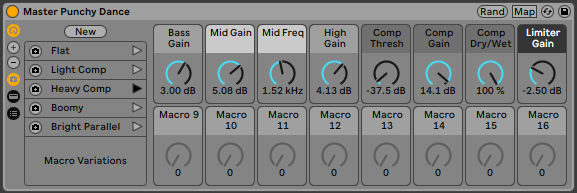
Macro Control Randomization
New to Ableton Live 11 is the macro randomization button, found at the top right of the effects/instrument rack device.
Clicking this button will randomize all of your macro controls. You can get creative with this to help explore what your racks are capable of.
Sometimes there is a macro you don’t want to be randomized. To make this happen, right click on the macro you want to remain fixed and click “Exclude Macro From Randomization”. Now when you press the randomization buttons, this macro will remain fixed.
The randomization button can also be mapped to your MIDI controller for on-the-fly randomizing.
Saving Macro Variations
So you’re madly clicking the randomization button and you finally find something you like, you can save this variation to the rack as a Macro Variation.
Clicking the New button above the variations list will save the current macro set up as a saved preset that you can call back later.
You can launch the snapshots of your macros by clicking the play button to the right of the variation name. The play button can be mapped to a MIDI note on your controller as well.
Piano Roll Upgrades
The Piano Roll received a lot of updates with the Ableton Live 11 release.
Keys and Scales
MIDI clips now have a feature to help show you the notes of the key or scale you are writing in. There is a dropdown menu to the left of the piano roll that allows you to select from a ton of key/scale options.
Once you select a key or scale MIDI notes that fall outside of the scale will be greyed out. This can be helpful for writing chord progressions, but can be a little prohibitive if you use it too religiously.
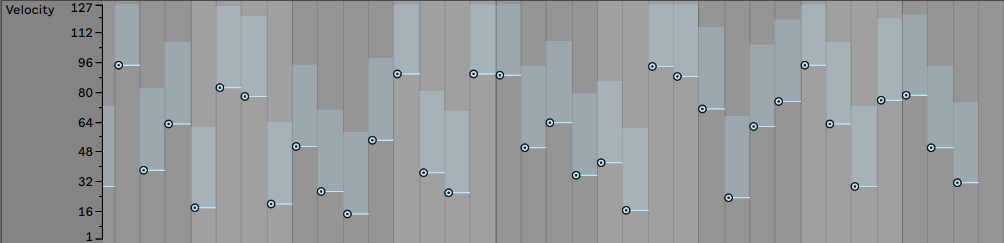
Randomization and Probability
If you ever have problems with boring repetitions, these two new features are for you.
Let’s say you have a drum pattern that was played in without any velocity recorded. The drums will sound pretty static and boring. You can set the velocity range in the MIDI clip so the notes will randomly be played at different velocities.
Clicking the randomize button will randomize the velocities of all selected notes. The amount bar to the right of the button will adjust how extreme the randomization is.
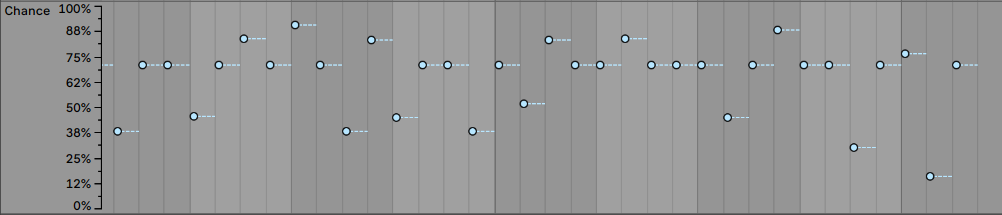
Underneath the velocity section in the MIDI clips is the new probability section. Probability will determine how likely a note is to play at all. This can be used to change up boring static patterns that sound repetitive when played over and over again.
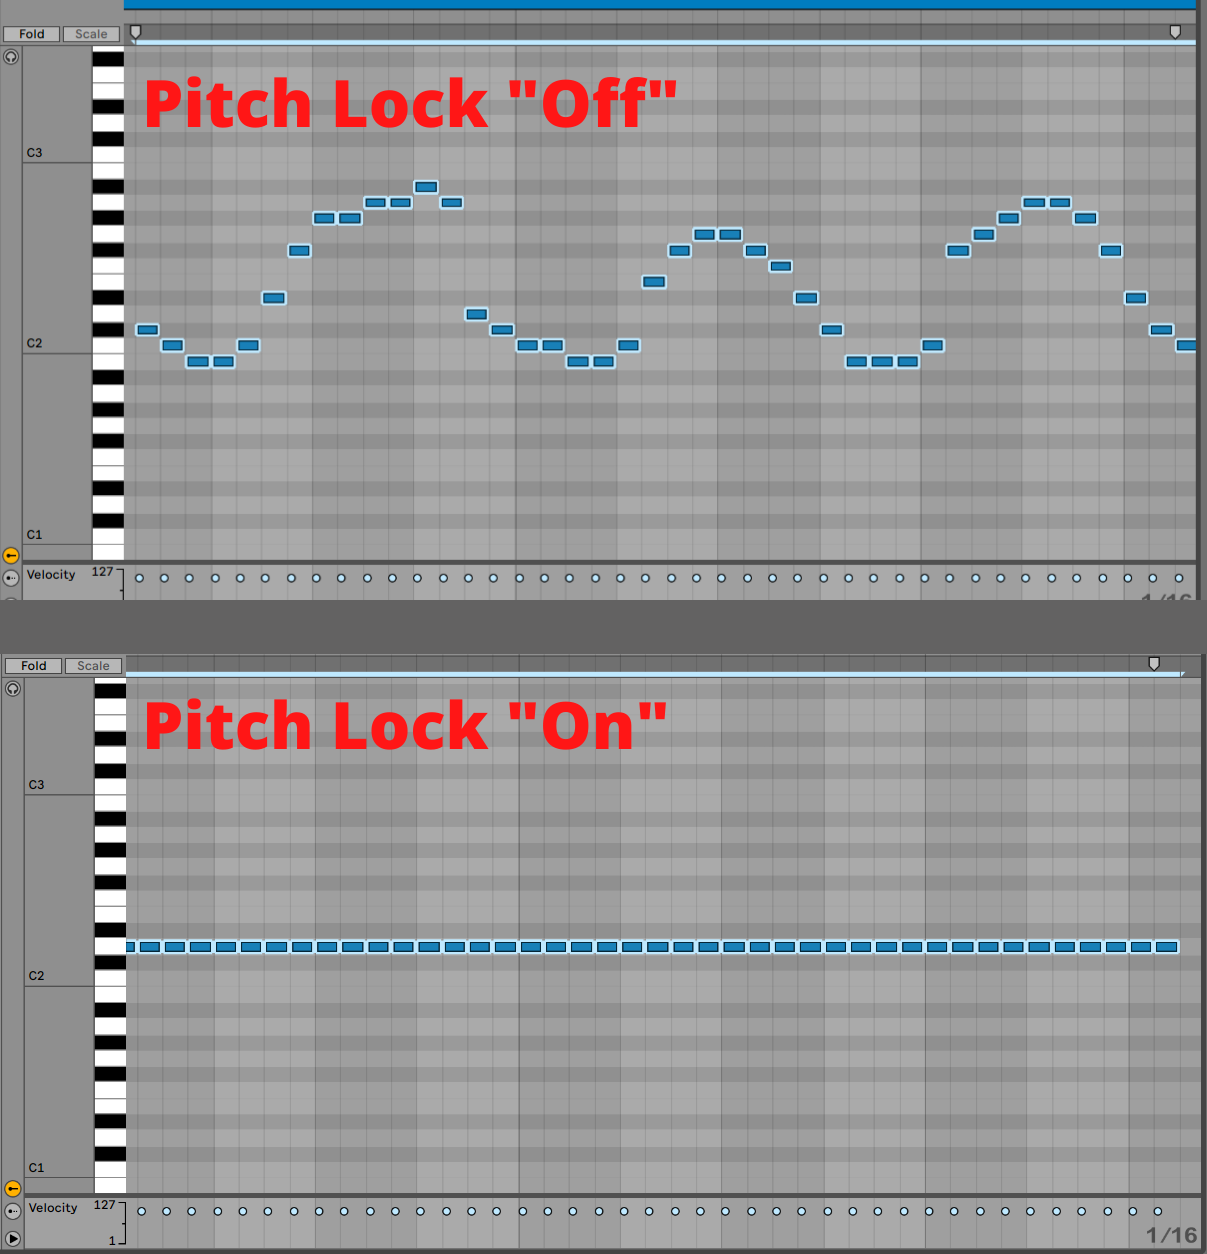
Draw Mode With Pitch Lock
In the preferences window, there is an option now called “Draw Mode with pitch lock”. Turning this option off allows you to click and drag to add notes to the MIDI clip. With this option turned on you can click and drag but will only add notes to the same pitch you clicked on.
MIDI Polyphonic Expression (MPE)
MPE allows you to add pitch bends, slides, and pressure expressions to individual MIDI notes. MIDI Polyphonic Expression can be added by playing the notes with an MPE enable MIDI controller or by editing expressions in the Clip Detail View of the MIDI clips.
With the addition of MPE, you now have 5 dimensions of expression when working with MIDI clips:
- Pitch bending individual notes
- Slide expression for individual notes
- Individual pressure expression (aftertouch)
- Per note velocity control
- Mod Wheel expression
In order to get MPE working, you need to use a device or plugin that is MPE enabled. There are 3 native devices that work with MPE; Wavetable, Sampler, and Simpler.
As for plugins, if the plugin is MPE enabled it will show “MPE” in the title bar of the plugin.
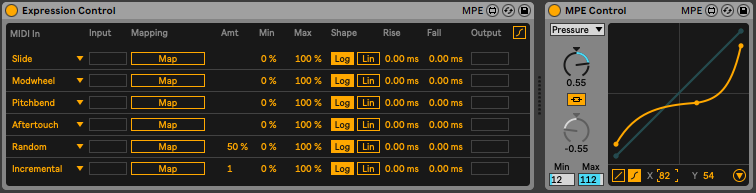
Helpful MPE MIDI Devices
There are 2 MIDI devices that can help you map out your MPE controller to plugins or devices that are not MPE aware.
Expression Control allows you to use the MPE data to modulate other parameters or controls. MPE control allows you to finely tune how the MPE information is sent to your MPE-enabled plugins.
Track Linking
Track Linking is one of the new features of the Ableton live 11 and it allows you to link several tracks together to edit them simultaneously. This will definitely help save you time when editing.
To link tracks together, highlight all of the tracks you want to link and then right click to select “Link Tracks”.
You can now edit multiple MIDI clips at the same time now. Simply select all of the clips you want to edit and all of the MIDI notes in those clips will appear in the piano roll for you to edit. This also works for MIDI clips in different channels!
CPU Upgrades
Updating Ableton Live’s CPU metering was a very welcomed decision. The CPU meter in the top right corner will now show you either the current or average CPU usage. Clicking the drop-down menu will show you the percentage for both.
Session view will now show you a per channel CPU usage meter. This is extremely helpful for pinpointing those pesky high CPU usage tracks so you can freeze them. You can show or hide the CPU meter by clicking the “Show/Hide Performance Impact” button to the right of the master track.
Having CPU troubles? Learn why they happen and how to fix Ableton CPU Overload problems.
Author: Mike P
Hi! My name is Mike! I’ve been an apartment producer/musician for 10+ years. I’ve played in punk bands, released EDM tunes on Beatport and iTunes, and have a semi-successful stock music portfolio. Read more…