The phaser and flanger in Ableton are among the most useful effects you can use in your track to add that psychedelic effect. These effects can add movement to boring hi-hats and they can make your guitars sound like they are flying through the sky like a jet plane.
There are a million different uses for these effects, but in most cases, they are great sound design tools. In this article we are going to talk about Ableton Lives amazing Phaser-Flanger stock plugin.
What Does a Phaser Do?
The phaser effect splits an audio signal into two copies. One copy is just the dry signal, but the second one is a phase-shifted version of the dry signal. When the two copies get merged into one signal again you get that iconic phaser notch sound. An LFO then sweeps that notch filter back and forth.
What Does a Flanger Do?
The flanger effect like the phaser splits an audio signal into two copies, but this time the two copies are identical. The only difference the flanger makes with the two copies is that it uses an LFO to modulate a slight delay in one of the copies.
How to Use Ableton Phaser/Flanger
The Ableton Live Phaser-Flanger is a multi-effects plugin that offers three different effects all relatively close in sound.
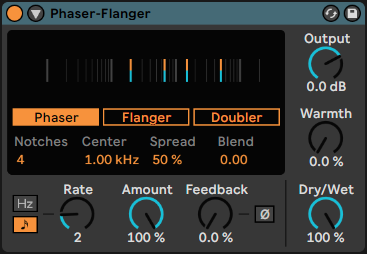
Starting from the left the first effect you get to pick is Phaser, followed by Flanger, and lastly Doubler.
All three effects share the same LFO sync, Amount, and Feedback controls.
The Amount knob sets the amount of LFO modulation so when set to 0 you can freeze the effect which is very useful for manual control of the effect.
The Feedback knob affects the amount of the signal that’s going to get fed back into the input.
On the right side of the Feedback knob, you can find the invert polarity switch which can get you a whole new sound from your effects when turned on.
So aside from these main few controls the effects themselves have several parameters that are unique to the type of effect in use.
Phaser
The Phaser effect has a cool display of the notch filters moving through the frequency spectrum.
The amount of lines you see depends on the number of notches you select in the Notches selector. You can go as high as 42 notches with Ableton Lives Phaser! Things get super trippy when you select a high number of notches.
Center – This parameter is used to specify the center frequency from which the notches are going to start moving.
Spread – This parameter adjusts the spacing between the notches.
Blend – This parameter blends the modulation routing between the Center and Spread parameters.
Flanger
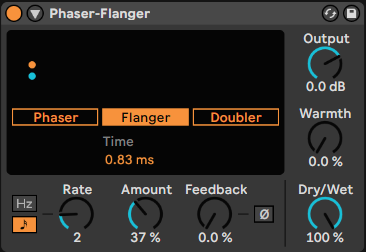
We talked earlier about how Flanger just merges a dry signal and a slightly time modulated signal to achieve that famous flanger sound. And as you can see in the picture above the only control Flanger has aside from the standard controls is a time parameter.
The visualizer shows how far the delay line goes and it’s affected by the Amount knob.
Doubler
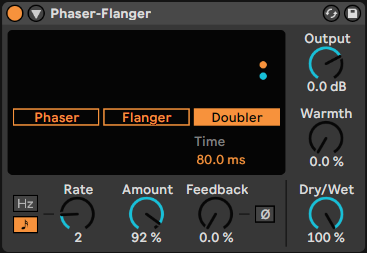
The Doubler is a secret effect you wouldn’t expect to find in a plugin called “Phaser-Flanger”. This effect uses time-modulated delay signals to create a doubler tracking effect. This is a very useful effect commonly used to widen guitars.
When mangling the controls a little bit you can get some pretty insane psychedelic effects as well and you can make your sounds more metallic by adjusting the feedback knob on this effect.
Master parameters
The master parameters for Phaser-Flanger are Output, Warmth, and Dry/Wet.
Warmth is an unusual parameter that we can find in the Chorus plugin as well.
This parameter adds slight distortion and filtering to make the effect sound warmer and “analog”.
Conclusion
Phaser and Flanger are great tools for taking your music to a whole new dimension and Ableton Lives Phaser-Flanger plugin gives you all the power of these effects a plugin can offer.
Author: Nadir
Hi there, my name is Nadir aka Nadrisk. I’ve been a bedroom music producer for 8+ years. I do everything in the box and I use Ableton Live as my weapon of choice. Apart from music production, I do mixing and mastering, audio/video editing, and sound design.
Listen to Nadrisk Here


