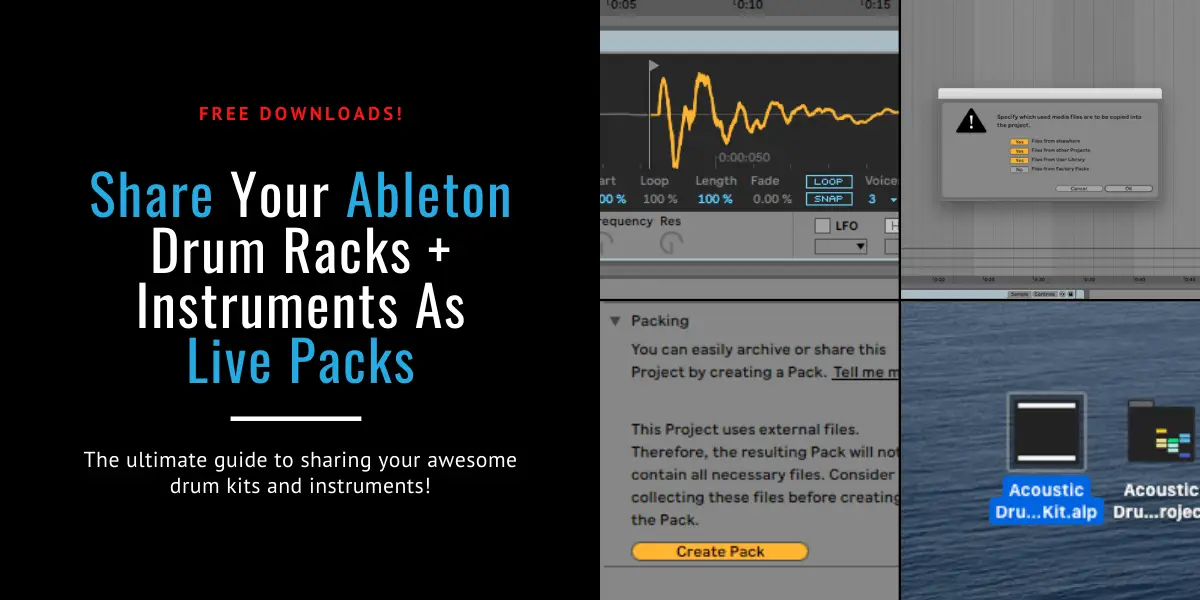
Ableton Live Packs make it super easy to share and collaborate with other Ableton artists. This is because Live Packs collect and compress your current session into a single, easy to share “.alp” file.
Thankfully, creating a Live Pack can be done in 4 super fast and easy steps.
- Save your drum kits, instruments, effects racks
- Drag your presets into the current project folder
- Collect all and save from the file menu
- Manage project and click “Create Live Pack”
Download the free Ableton Live Pack we created for this post. Made with samples from an acoustic drum kit!
We’ll also take a look at how to properly install a Live Pack. Also super easy.
First, let’s look at why you might need to create an Ableton Live Pack.
Why Create An Ableton Live Pack?
Ableton has made sharing and collaborating with other Ableton users a breeze. You can share anything from a full completed live session to just a single drum rack preset. All in just a single file…
Introducing the Ableton Live Pack!
These are basically a zipped up version of your current session. Live Packs are able to collect all of the files included in your session and then share a 100% complete version of it with another computer.
Here are some reasons for creating Ableton Live Packs
- Collaboration with other Ableton artists
- Sharing custom drum racks or sampler instruments
- Archiving your finished Ableton project files
Collaboration with other Ableton artists
Live Packs allow artists to share complete Ableton Live sessions with each other. As long as both artists run the same version of Ableton and use the same plugins.
Once the second artist is finished working on the project, they can create another Ableton Live Pack to send back. Repeat as necessary.
The compressed size of the .alp file is much more transfer friendly than a zipped session folder is (see below).
Sharing custom drum racks or sampler instruments
If you’re like us, you like to share your custom instruments and kits with other Ableton users. The easiest way to do this is with an Ableton Live Pack.
Copy your rack presets to the current project folder, then follow the instructions below and you’re ready to share!
Archiving your finished Ableton project files
When Ableton creates a Live Pack it also compresses the files within the pack. Compression can sometimes even be as efficient as 50% file size!
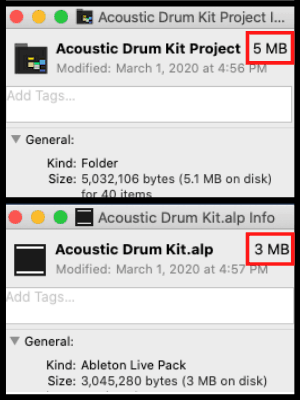
The reduction in file size makes Live Packs not only great for sharing, but also for archiving completed projects. Just think of how big your “Finished Projects” folder is. Now imagine the size of that folder reduced by 20%-50%.
Ready to get started?
How to Create an Ableton Live Pack
As mentioned above, creating an Ableton Live Pack is super easy. But, there are a few details you should be aware of. Let’s take a deeper look into the process.
Save your drum kits, instruments, effects racks
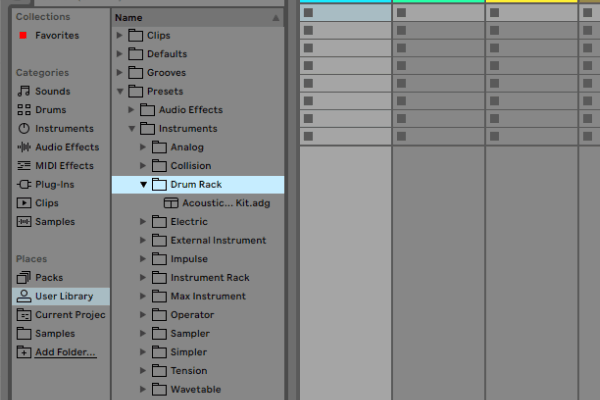
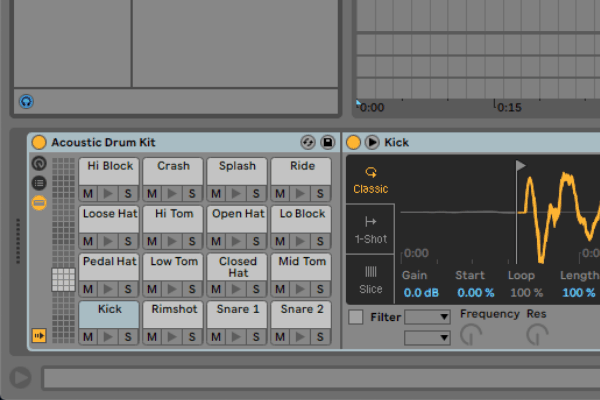
The first step is to save the presets, drum racks, or instruments that you want to include in the Live Pack. Click the “Save” button in the corner of the instrument or effects rack. Name the file whatever you wish.
We named ours “Acoustic Drum Kit”and it saved to the Drum Rack folder in our Presets. On to the next step…
Drag your presets into the current project folder
Once all of the instruments are saved and named, you need to move them to the current project folder. To do this just drag the newly created .adg or .adv file into the “Current Project” folder in the Places menu.

Collect all and save from the file menu
Ableton Live Packs saves whatever files are in your current project folder. So if you are using external samples and loops, you need to gather them all together.
To do this Click on File->Collect All and Save. A dialogue box will ask you types of files will be collected into your project folder.
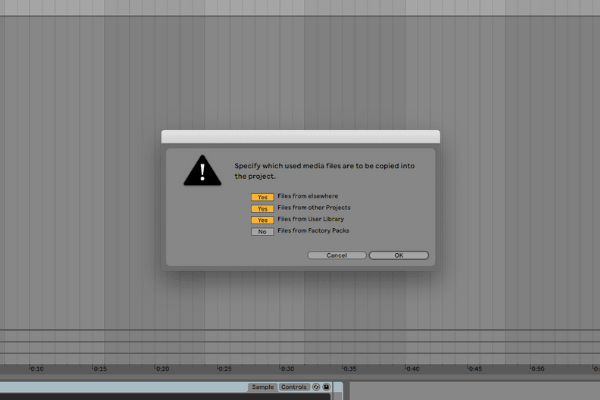
Here is what each of the 4 options above does when you hit “Ok”.
Files from elsewhere – Selecting this option will collect and save any external audio files you use in the project. These would be samples from your own sample collection or any 3rd party Live Packs
Files from other Projects – This option will collect and save files from other Ableton Projects. Audio files like recordings or freeze clips will be copied to your new project folder.
Files from User Library – Samples and presets from your User Library are transferred to your current project file if you select this option.
Files from Factory Packs – As you may have guessed, this option copies any content you use from the Ableton Factory Packs. You can select this option if you are sharing a full session with another artist. We don’t want to include any Factory content in our sample packs so we deselect this option.
You should select any of the options that apply to your session. As a safeguard we select the top 3 as pictured. Just to make sure we get everything.
Where does “Collect All and Save” save to?
All of your collected files will be saved in your Current Project folder.
Once you click “Ok”, Ableton will begin copying the files to your Current Project folder. After the transfer is completed, you should be able to open your Project folder to see all of your project files.
Manage project and click “Create Live Pack”
After you have collected “all” of your files, you should open up the project manager. Depending on how large your project is you may still have some files to collect.

To open the “Manage Project” sidebar you will need to open your Current Project folder in the left sidebar and right click under the files. From the menu, select “Manage Project”.
Another way to do this is to click File–>Manage Files… and then click on the “Manage Project” button in the right sidebar.
The purpose of this sidebar is to collect, clean and save your Ableton Live Sessions efficiently.
Missing Files – This section will tell you if you have any missing files in your Ableton Live session. If there are missing files you will be able to locate and save them to your project folder. Save any missing files to your current project.
External Files – Here you can see if you are using external files in your project. If you are, it will also show you how many and ask you if you want to collect them into the current project. Select “Yes” if there are any external files.
Unused Files – Ableton will also tell you if you have any files in your Current Project folder that are not being used by the Session. If you do have unused files, you can remove them from the sidebar. This helps keep the files size of the project down. Remove any unused files if necessary.
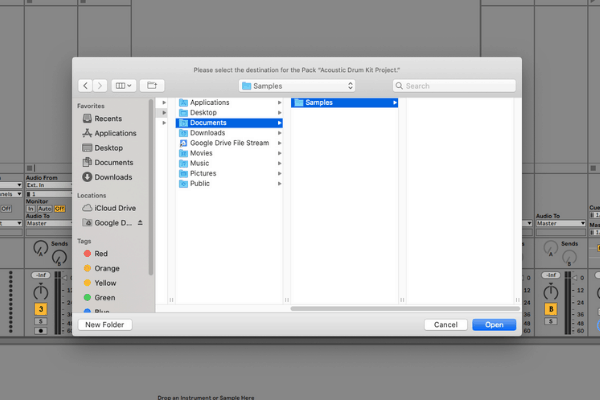
Create Live Pack – This is the final piece of the puzzle. All of your files are safely contained inside the Current Project folder and you are ready to create your Ableton Live Pack. Click Create Live Pack and select your save destination.
Side note: 3rd party plugins
If you are creating a Live Pack with 3rd party plugins you might have some trouble sharing. Whoever opens your Live Pack must also have a copy of the 3rd party plugins installed.
You can get around this is the Pack does not require the plugin itself but just the sound. Simply “Freeze” the track and “Flatten” the track to a .wav file. Now you can share your Live Pack with the sound from the 3rd party plugin without the need for the plugin.
How To Open and Install A Live Pack
Installing Ableton Live Packs is super easy too!
- Double-click your Live Pack file
- Select your install folder
- Point your Ableton Live browser to the Live Pack
- Open one of your new drum racks or instruments
Simply double-click the Live Pack file and select the folder you want to install the Live Pack to. We suggesting installing Live Packs into your “Samples” or “Presets” folder, whichever one you use the most.
In the Ableton browser (left side panel), navigate to the folder you installed the Live Pack.

Look for the Ableton preset files (usually .adg) and double-click them to load them to the current track.
If you want you can also copy the .adg files to your User Library. Whatever is easiest for you.
Free Live Pack Download!
Try installing with the Acoustic Drum Kit Live Pack (direct download) we made for this post. This pack was created using drum samples from an old recording session. Can’t remember the make of the drums but they sound pretty good!
Where To Find Awesome Live Packs?
Want to download some more super awesome free Ableton Live Packs to play around with? Here are a few of our favourite and recommended packs:
- Massive collection of Live Packs from Brian Funk
- Talk box style synth from Slynk
- Large collection of Live Packs from ELPHNT
Author: Mike P
Hi! My name is Mike! I’ve been an apartment producer/musician for 10+ years. I’ve played in punk bands, released EDM tunes on Beatport and iTunes, and have a semi-successful stock music portfolio. Read more…