Latency can cause utter madness when recording instruments, vocals, or external hardware in Ableton Live. You might play or sing on time but the recording in Ableton is slightly off time. This is usually caused by latency with your audio interface.
Let’s take a look at what causes latency in Ableton and how to fix it.
What Is Latency
Latency is essentially the time it takes your computer, audio interface, and cables to transmit an audio signal.
There are 3 common areas latency can be created; in the audio interface, in your computer, and in your DAW.
Your audio interface takes time to convert the incoming analog signal to a digital signal.
Your computer will take a bit of time to process the digital signal from the interface before it gets to your DAW.
Any processing within your DAW also takes time and thus causes latency. In fact, in Ableton, if you hover over the title bar or any plugin or device, the latency will be displayed in the lower-left corner.
How Latency Is Created
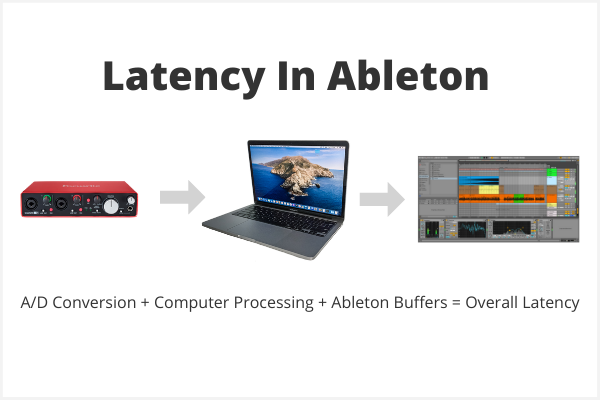
In the case of recording guitar into Ableton Live, your signal chain will start with guitar. The guitar sends a signal through the cable and into the input of your audio interface.
This is where the analog to digital conversion of the audio signal takes place. It takes time to convert the signal from analog to digital. A small amount of time but time nonetheless.
From here your audio interface sends the signal into your computer. Your computer may be running other software which may impact the speed at which the digital signal is transmitted to Ableton.
Once the signal is in Ableton, any amp sims or Ableton devices you are running will cause latency. Ableton uses audio buffers to combat the latency caused by processing. The bigger the buffer the longer the latency.
The total time combined between the A/D conversion, computer processing, and Ableton processing results in your overall latency.
How To Reduce Latency
There are a few tips and tricks you can use to help reduce latency in your music production setup.
Ableton Live Latency Settings
The first place to go for optimizing your latency is in the Ableton Live Preferences menu.
Navigate to the Audio tab and look for the Sample Rate and Latency sections.
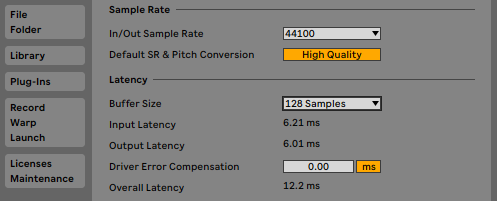
Sample Rate
In the sample rate section, you should choose the sample rate you wish to work with. Most music audio is 44,100Hz while video and special audio tend to be in 48,000Hz.
Latency
Under the latency header, you’ll see 2 parameters (on Mac at least); Buffer Size and Driver Error Compensation.
Buffer Size is where you will choose the size of the audio block Ableton uses as a buffer. Audio will be processed in blocks ahead of the current playback location to help ensure smooth playback. Much in the same way Youtube buffers a video.

The bigger the buffer block, the more audio that is processed and the longer it takes. The smaller the buffer, the less audio that is processed and the shorter it takes.
You’ll want to set the Buffer Size to the lowest size you can without distortion or artifacts. To test this you can use the Test Tone section in the Ableton preferences.
It is good practice to aim for 10ms of latency or less if you can get it. Anything over 10ms usually becomes audible and will cause noticeable latency.
Sometimes an audio interface will incorrectly report the driver latency in the Latency section. You’ll notice this when recording with the monitor set to OFF. The recorded audio should line up in time with the music. If it doesn’t this is where Driver Error Compensation comes in.
DEC allows you to tell Ableton how much the reported latency and the actual latency are off. For more on this topic, check out Ableton’s article.
Now that you have your audio interface buffer settings dialed in let’s look at some other ways to cut back on latency.
Freezing Tracks
This one is a simple one. If you are working on a large project, you usually have many devices or plugins open. All of these plugins are eating up processing power and CPU.
Freezing tracks can help “freeze” this processing power and will free up the CPU to focus only on what is necessary at the time of recording.
You can either unfreeze the track when done or flatten it.
External Hardware Latency
Hardware drum machines and synthesizer will have their own latency. There is no way for Ableton to fix this latency, but you can compensate for it.
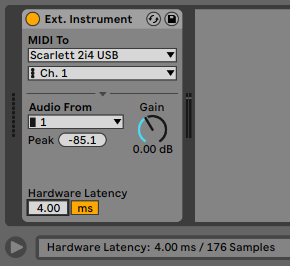
On the MIDI track you are using to trigger your hardware, load up an External Instrument device.
In this device, you can route the MIDI and also route the incoming audio from your hardware. Essentially turning your drum machine or synth into a plugin.
Now record some audio from the hardware and check for latency on the recording.
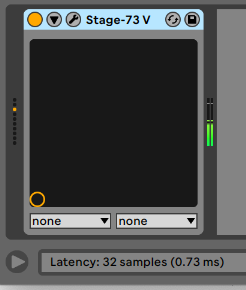
If you find the track is recorded off-time, you can measure the milliseconds of the delay. First, turn off the grid in Arrangement view. Then zoom in on the audio with latency. Highlight the area between the start of the MIDI note and the beginning of waveform in the audio clip.
In the bottom left corner, you will see how long the latency is in milliseconds.
In the External Instrument device, set the number of milliseconds in the Hardware Latency box.
Your recording should now be on time!
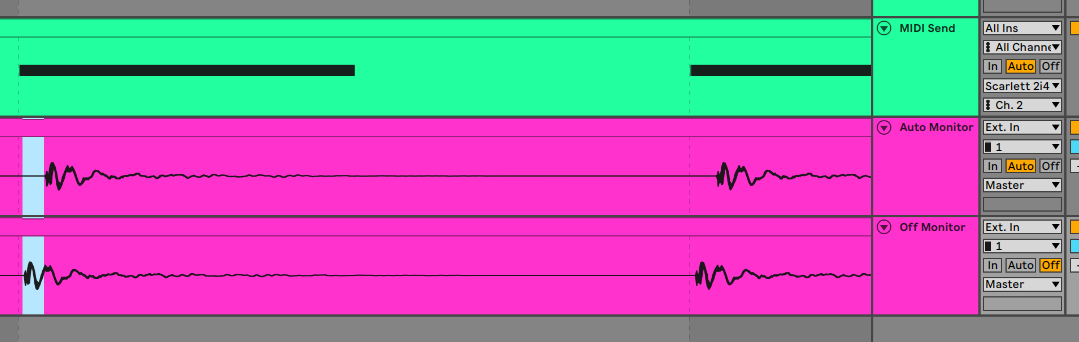
Recording With Monitor Off
To go back to the example of recording guitar, you will most likely be recording with the track monitor set to Auto. This is great for listening to your recording but it actually introduces latency once you record.
It takes time to process any devices or plugins you may have in your guitar track. With the track monitor set to Auto, you will be able to hear what you are recording. But because Ableton must process the incoming signal, latency is added to the signal.
To fix this issue, set up 2 guitar tracks and arm them both for recording. Set the monitor on one track to Auto so you can hear what you play. Set the second track monitor to OFF. Recording with the monitor off removes the time needed to process the effects you apply to your recording track.
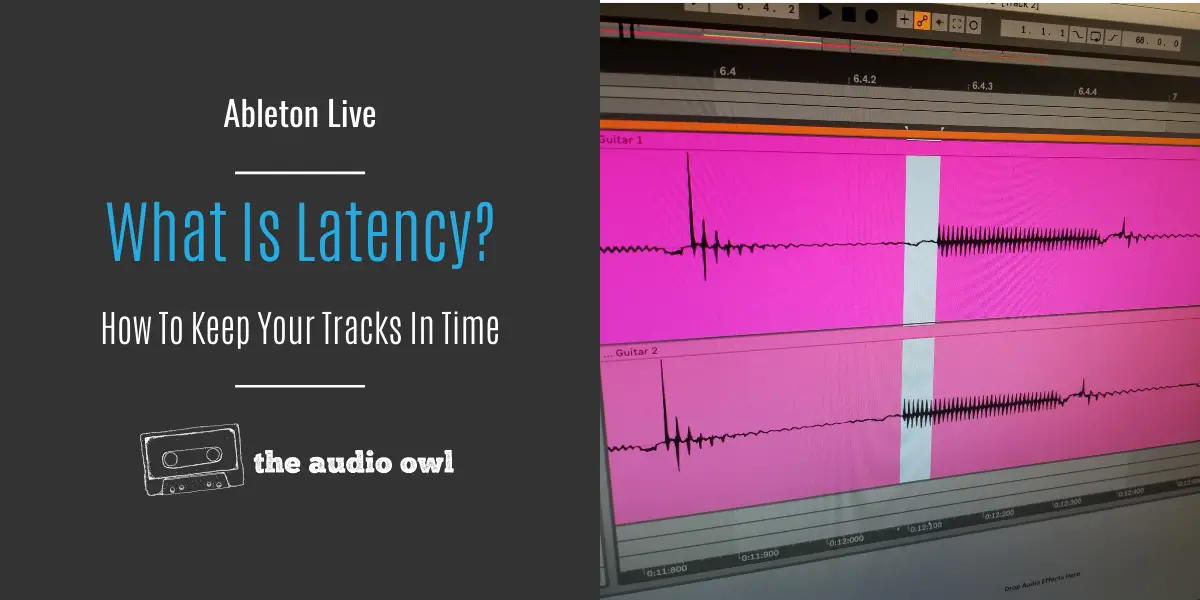
This is demonstrated in the image below. We recorded our drum machine playing some MIDI notes from Ableton. The top pink track had monitoring set to Auto and you can see the drum hit falls slightly offbeat.
Take a look at the lower track, we recorded this one with monitoring set to off and it is pretty close to the playing right on the beat. The delay we see in this track may be caused by a hardware delay.
Once you have your recording you can delete the offtime track and voila, your recording is on time!
Author: Mike P
Hi! My name is Mike! I’ve been an apartment producer/musician for 10+ years. I’ve played in punk bands, released EDM tunes on Beatport and iTunes, and have a semi-successful stock music portfolio. Read more…