Gain staging is an important first step when mixing in Ableton. Whether you have just imported your stems or bounced your tracks, you’ll need to make sure the input levels are hitting the sweet spot.
So how do you do that in Ableton Live?
In this article, we’ll take a look at how to set the optimal levels at each stage of your signals processing. Doing this ensures a good clean signal throughout your mix and a great final mixdown.
How To Gain Stage
Gain staging is the process of making sure the audio you send to a device is at the correct volume. You don’t want to send a clipping signal into a processor, otherwise, you end up processing the clipping.
To avoid this, we look at each link in your audio chain and set optimal levels. The sweet spot is right around -12dBFS to -20dBFS. To find out why that is the sweet spot, check out our other article about Gain Staging.
You want to start with your source, either the audio clip or the instrument on a MIDI track. Then work your way through the devices and plugins, and finally over to the faders.
Using VU Meters
Gain staging with a VU meter plugin can make things much easier (and also slightly more confusing). The idea of the sweet spot is based on setting levels on analog gear. The ideal signal level for analog is with the needle hovering around 0VU on a VU meter.
By using a plugin we can visually see when our signal is hitting the optimal level for the next stage of processing.
VU Meters and Drums
The VU meter can be a troublesome indicator when gain staging drums. The same applies to any instrument with a quick attack.
You’ll most likely encounter a situation like this. The VU meter is hovering right in the sweet spot, but Ableton’s meters are clipping.
This happens because the VU meter reads the audio signal as an average (RMS). Therefore, the measured level would be lower than the peak of the signal.
The meters in Ableton read true peaks, so they are capturing the very highest point of the sound waves.
To work around this issue, it is best to use Ableton’s meters to set drums. Setting them no higher than -6dBFS should do the trick. The kick and snare tend to be the loudest elements in a song anyways. So setting these at the highest possible peak sets you up for a well-balanced mix.
Gain Staging In Ableton Live
In Ableton Live, gain staging can be somewhat tricky. Only because it is not always easy to tell if your levels are in the sweet spot.
As a rule, we generally will use a VU meter between each plugin and use 0VU as our sweet spot. If the meter between the plugins is clipping then we will lower the volume until the clipping is removed.
At the end of our plugin chains, we use a dBFS meter and set the level between -12dBFS and -20dBFS.
Setting our levels this way allows us to use our plugins at their optimal levels. Then, because we set the pre-fader level to the dBFS sweet spot, we have tons of headroom for the master channel.
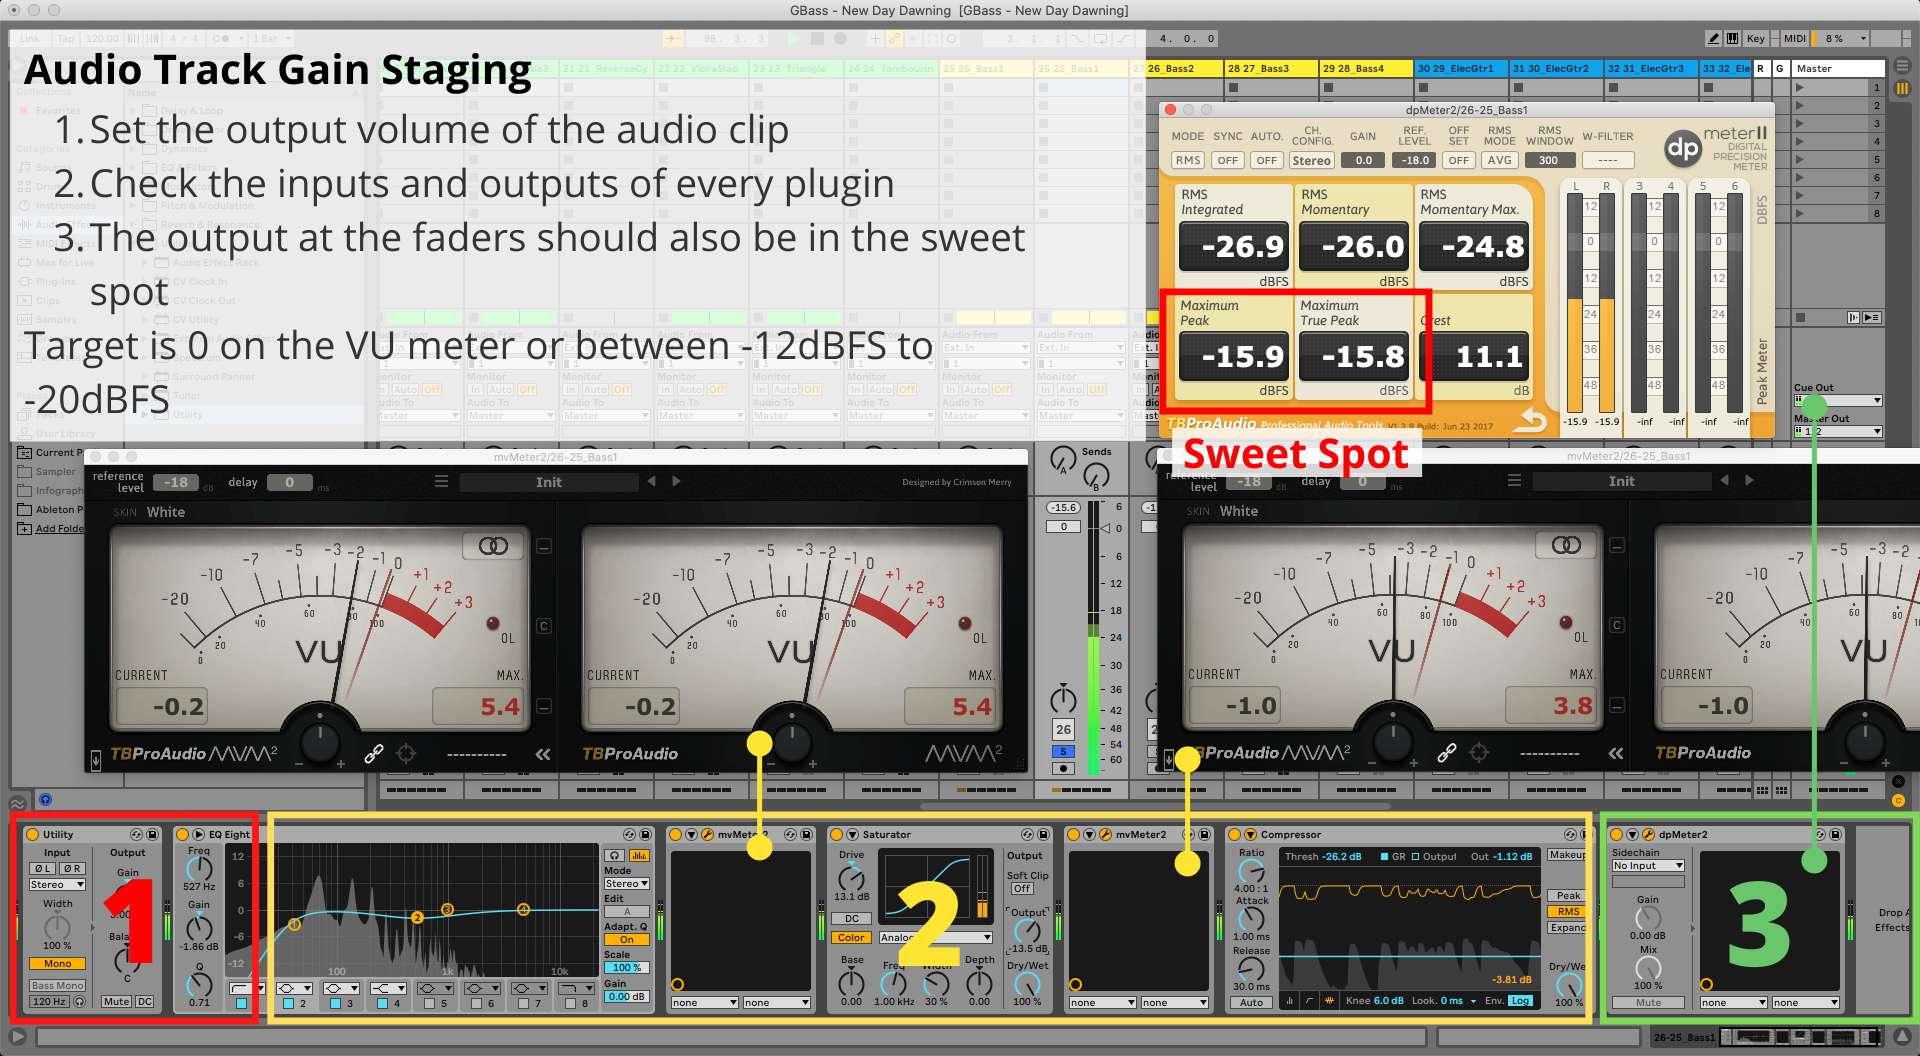
Gain Staging An Audio Track
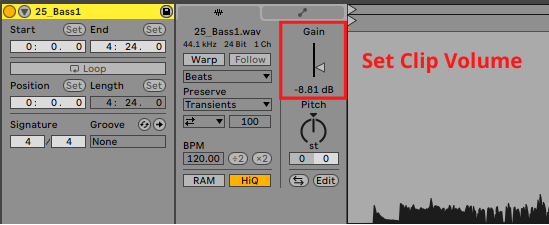
The first thing to think about when gain staging an audio track is your clip gain. Place a VU meter as the first device on your track. Use the gain in the clip window to set the level to the sweet spot. Reduce the gain if the first meter in the track is clipping.
Once this is set, you can delete the meter to save the CPU.
After the clip gain has been set, you want to look at your plugin chain.
Drop a VU meter after each plugin. Using the output gain or a separate gain plugin, set the VU meter to 0VU. You want to make sure you are driving a signal of 0VU into each plugin or device. As always watch for clipping and reduce gain if clipping occurs.
Finally, you want to add a dBFS meter at the end of your plugin chain. Use this meter to set the volume within the -12dBFS to -20dBFS range. This will ensure that the level hitting your fader is within the sweet spot.
At this point, you should have a perfectly gain staged audio track with a fader set to unity gain (0dBFS).
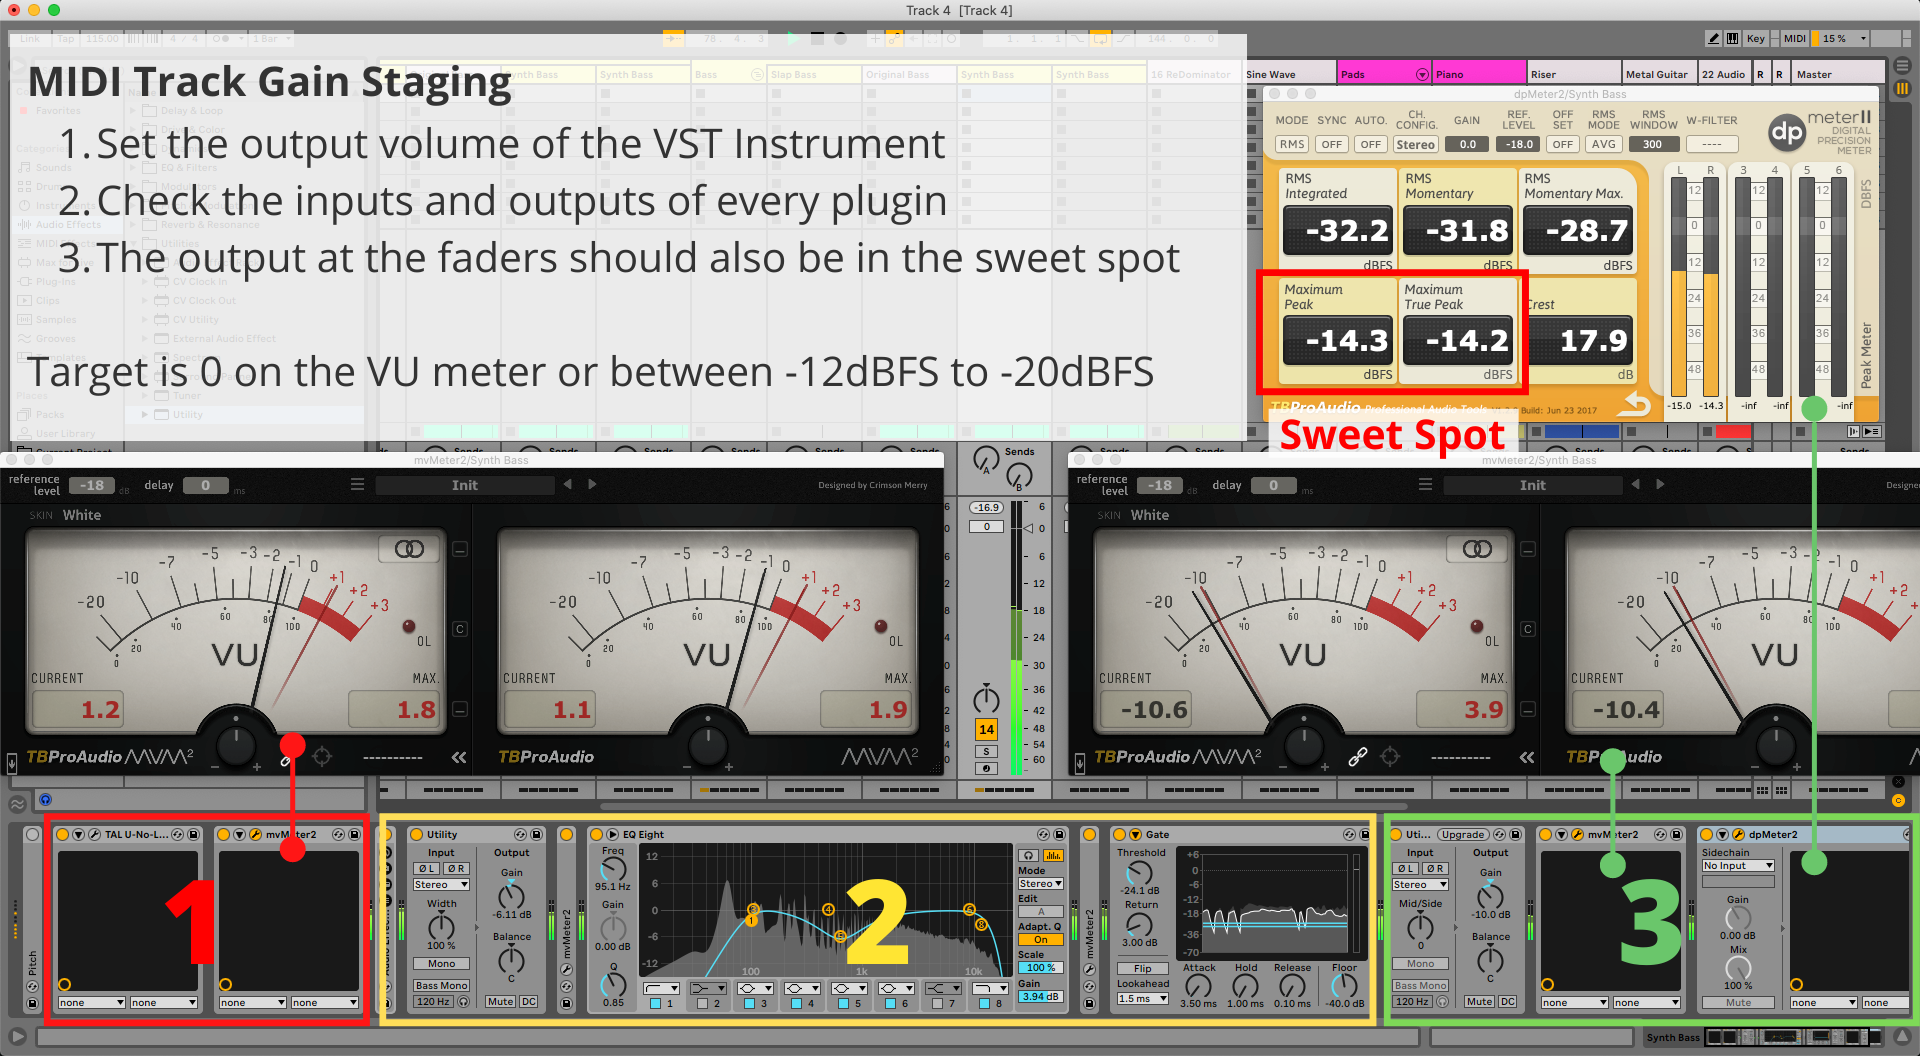
Gain Staging A MIDI Track
Setting optimal levels on a MIDI track is more or less the same as the audio track.
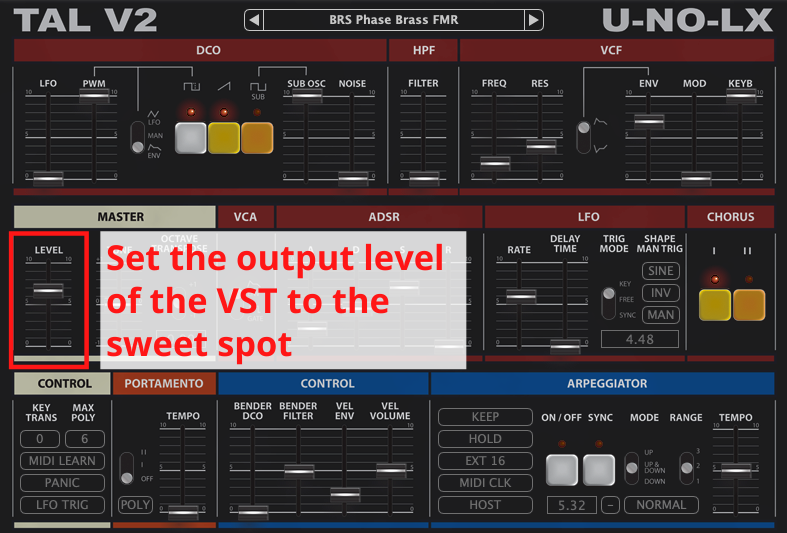
Since you are starting with a VST instrument, you’ll want to set the output level of the instrument to the sweet spot. Drop a VU meter after the instrument to accurately set your levels.
Once your initial level is in the sweet spot, follow the same directions as an audio track. Use the VU meters in between plugins. At the end of the chain use a dBFS meter to set the level to the Full-Scale sweet spot.
Now you should have a perfectly gain staged MIDI track with a fader set to unity.
Gain Staging A Return Track
Setting gain staging levels on a return track is a little different.
Because you are possibly sending many tracks to a return track, the potential for overloading the input is high. Especially when sending drums to a parallel compression return.
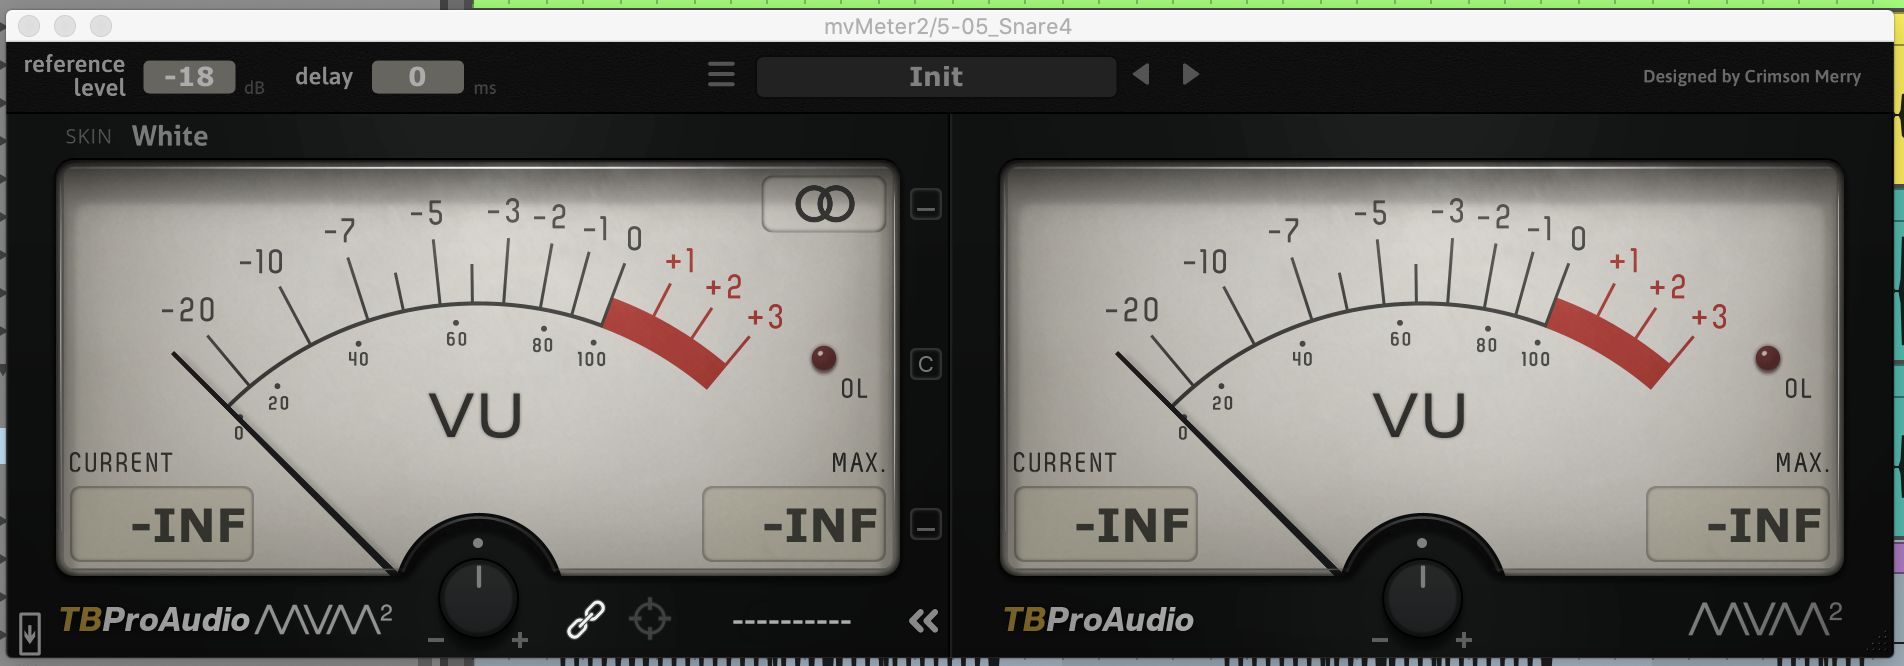
The image below shows the input meter of the return track after we send all of our drum tracks to the parallel compression.
As you can see, the input meter is clipping.
The solution for this is to lower reduce the send level of each of the drum tracks. If each send parameter is set to 100%, reduce them all an equal amount until the clipping is no more.
The input clipping issue is less likely to happen if you are sending instruments to a return track with reverb or other modulation. If it does occur, follow the same steps as with the drums to remove the clipping.
Once you have the input of the returns set to the sweet spot follow the same steps as the audio and MIDI tracks to gain stage your return plugins.
The signal before your faders should be within the dBFS sweet spot. With your fader at unity gain, you can now use the return faders to mix the perfect amount of parallel compression or reverb.
Finding A Plugins Sweet Spot
Many plugins are designed to work around -18dBFS which is equivalent to around 0VU on a VU meter. This is because, in analog days, 0VU was an optimal level for driving analog hardware.
However, some plugins have different “sweet spots”.
Check the manual for the plugin you are using. Most of the big plugin companies will include an optimal range of input signals for their plugins.
Read more about plugin sweet spots here.
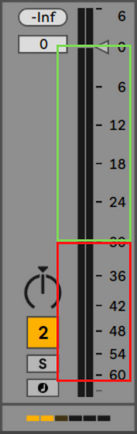
A Note About Faders
It is good practice to leave the faders at 0 when gain staging. Because most faders are on a logarithmic scale, they have more resolution at the top. This means we can make finer adjustments during mixing if the faders are still at 0dBFS.
When looking at the image below, the green zone represents 30dBFS, and the red zone represents 30dBFS. We can instantly tell that the green zone is larger than the red zone. This tells us that there each movement of the fader in this zone represents a finer movement with greater detail.
In fact, the closer to the 0 level on the fader, the better the resolution. This allows us to really fine-tune levels when doing a final mixdown.
Free Gain Staging Plugins
There are a handful of free plugins out there that can help with gain staging your mix. VSTs like VU meters and automatic gain staging plugins. dBFS meters can also be helpful in DAWs like Ableton where not every meter has the units marked.
Here are a few we recommend, for more check out our article about free plugins that help with gain staging.
Auto gain staging: HoRNet TheNormalizer
VU Meter: TB Pro Audio MVMeter2
dBFS Meter: TB Pro Audio dpMeter
Max4Live: LAEX Volume Compensator
Author: Mike P
Hi! My name is Mike! I’ve been an apartment producer/musician for 10+ years. I’ve played in punk bands, released EDM tunes on Beatport and iTunes, and have a semi-successful stock music portfolio. Read more…