Ableton Live’s Simpler can be an extremely useful tool when producing music. Simpler is used for drums, creating custom instruments, and even triggering loops.
You’ll find Simpler in all 4 versions of Ableton: Lite, Intro, Standard, and Suite.
In this article, we’re going to look at the 4 main modes of Simpler and how they can be used in music production.
Let’s get started!
Looking for Sampler instead? Read our in depth guide to Ableton Sampler, you’ll even find some free alternative plugins you can use.
What Is Simpler?
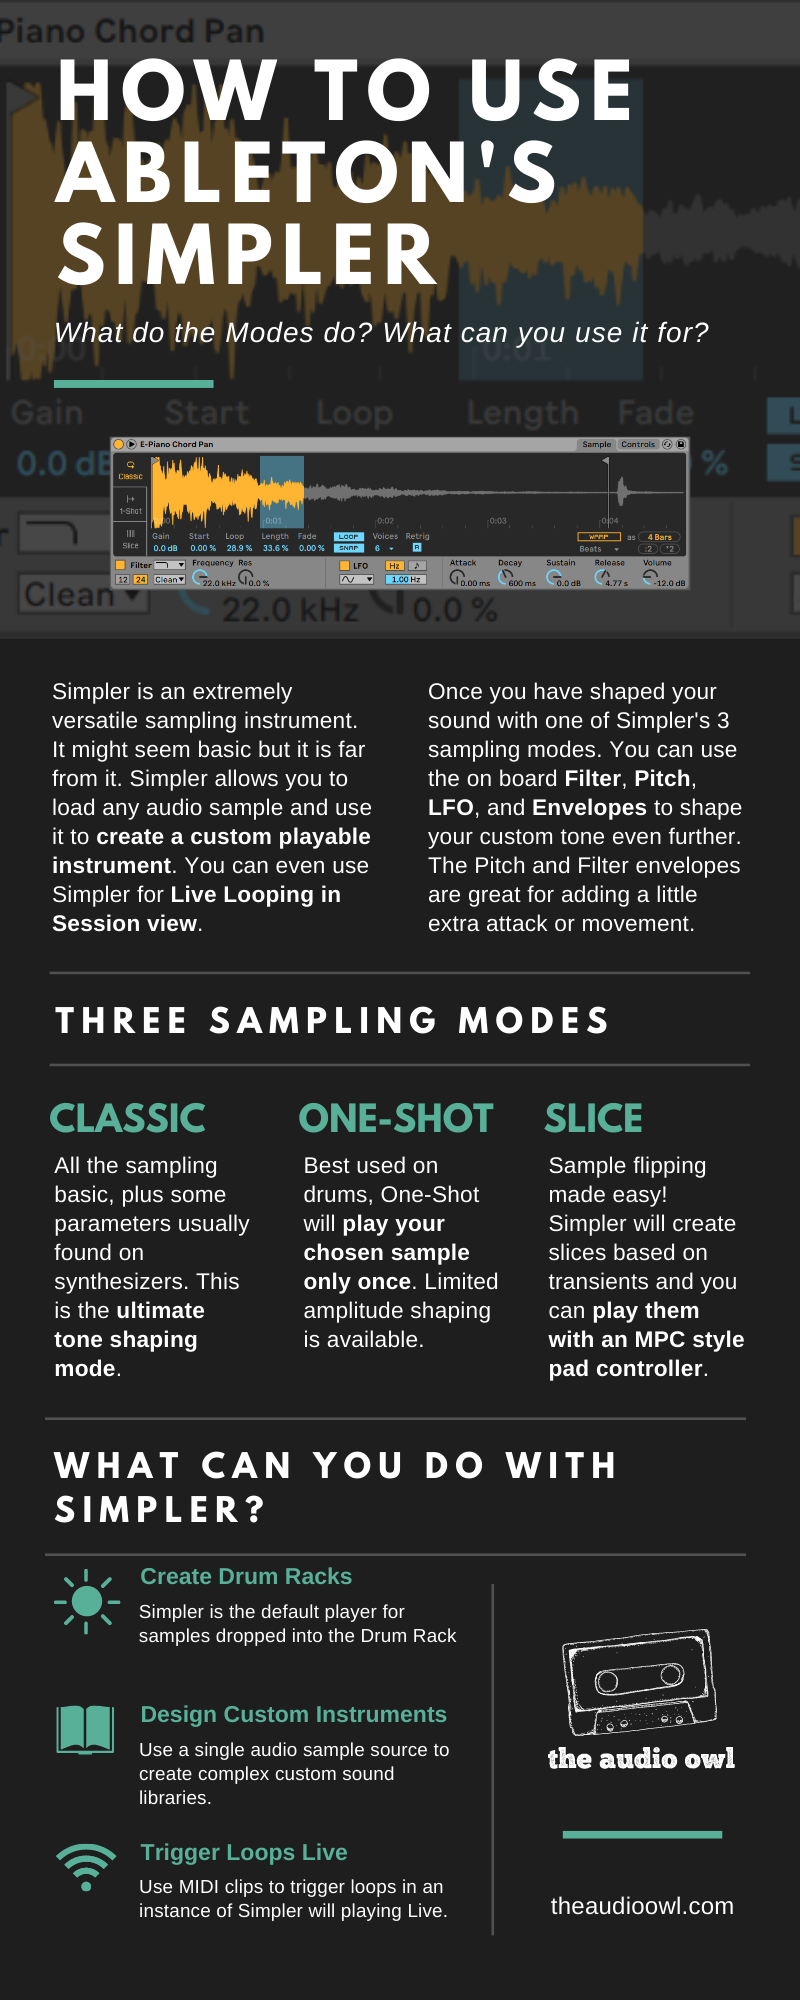
Simpler is a super simple, easy to use audio sampler with classic synthesis parameters. You can drag and drop any audio file you want into Simpler and start working with it instantly.
Use it to create a fully playable instrument preset from a single note sample, or use it in the drum rack to help shape your drums.
You can shape your sounds with an ADSR envelope or modulate the filter with an LFO with the integrated synth style controls.
Simpler is exactly as its name implies, a simpler version of Ableton Live’s Sampler instrument.
Ableton Simpler vs Sampler: What’s The Difference?
So what’s the difference between Simpler and Sampler then?
In short, Simpler is better suited for working with single audio files. Sampler is better for working with multi-sample instruments. There are also many more in depth sound shaping features found in Simpler’s big brother.
Sampler
This is the instrument you want if you are trying to create a super complex sampled instruments. Sampler allows you to use multiple samples which can be used to create velocity responses and more realistic pitch response.
Sample notes in the lower, mid, and upper ranges of your sampled instrument and pitch them across the keyboard using the key zones. Or, the samples could be of difference velocities to add some dynamics to your instrument.
You do this by adding zones to the instrument and selecting the sample you want to play when a specific zone is played.
The envelopes, filters, and LFOs all for much more control over the sound. Sampler has 3 LFOs, a Filter, Pitch, and Volume envelope, and you can even set up the MIDI controls for aftertouch, mod wheel and pitch bending.
Anyways, enough about Sampler, this one is about Simpler!
Simpler
Simpler on the other hand, starts with the basics, one sample that runs through a filter and some sound shaping parameters.
Don’t be discouraged, Simpler is still a powerful tool, even if it is simple.
Manage the sample in Simpler by using one of the 3 sampling modes. These modes allow you to use your samples in a variety of different situations.
Simpler is simply a music production workhorse.
Looking for Free Alternative Plugins? This TX16Wx VST sampler works just as well as Simpler does without all of the Ableton integration.
Modes of Simpler
There are 3 modes Ableton Simpler uses, each designed for a different purpose. Use Classic Mode to create your own sampled instruments. One-Shot Mode makes creating custom drum racks simple. Slice Mode turns Simpler into an MPC pad style sampler.
All 3 modes have controls to manage volume, transposition, panning and filters.
There is also a bonus Looping Mode found within the controls of the Classic Mode. Let’s take a look at each of the modes and their unique controls and parameters.
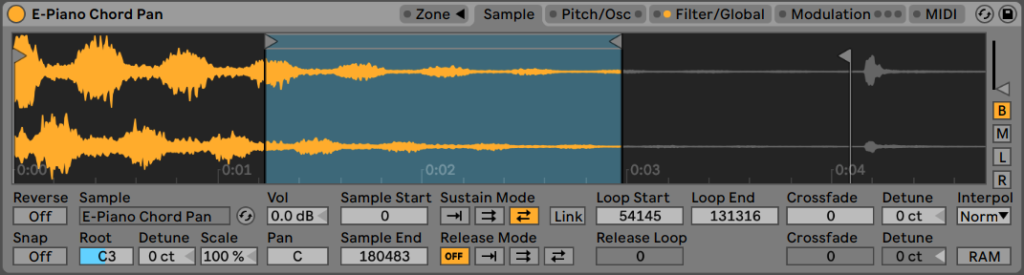
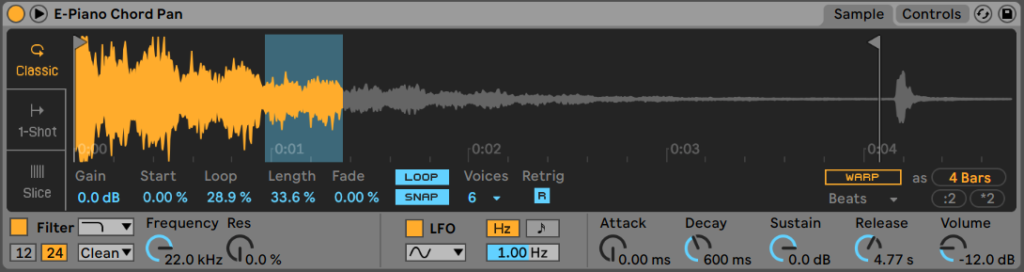
Classic
Classic mode works much like a generic sampler does. Define the region of the sound that you want played with the “flag” markers. Simpler will play the region of sound between the flags in the wave editor.
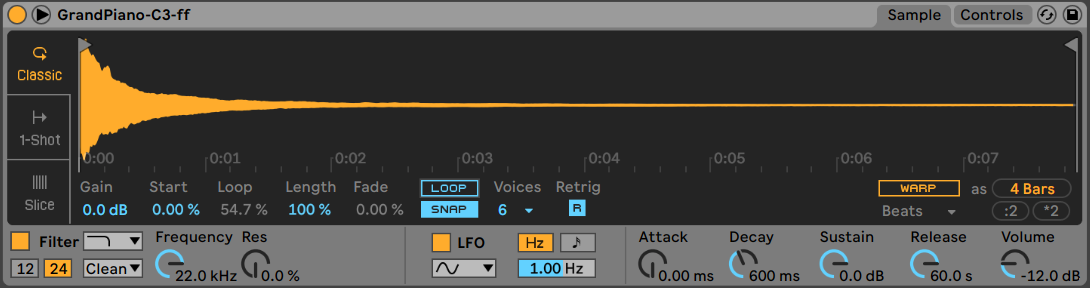
This mode features an ADSR envelope to help shape your sound exactly as you want it. There is also a loop function you can use if you need to add some sustain to your instrument. Just loop a section of the tail and adjust until it sounds appropriate.
One-Shot
One-Shot Mode is generally used when triggering samples with the Drum Rack. There are parameters to adjust fade ins and fade outs and to change the transposition of the sample.
The Trigger and Gate toggle changes the way the sample plays back after the sample is triggered. Trigger means that the entire sample will be played and Gate means that the sample is played as long as the trigger note is held down.
The fade out parameter can act like a release knob in this mode and will let the sample ring out after the trigger note is released.

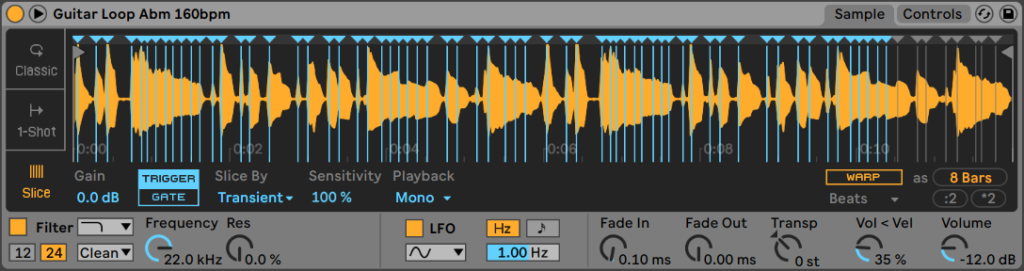
Slice
Slice Mode is by far my favourite way to use Ableton Simpler! Transients in your audio sample create slices which are then mapped to MIDI notes. Each note will play a different section of the sample, allowing you to remix or mash up your sounds.
This makes Simpler the perfect tool for doing MPC style sample flipping in Ableton.
Sometimes the slices are not in the most ideal position right from the start. In this case, zoom in on the waveform and adjust the slice point until it is just right.
We also see the Trigger and Gate toggle here, the functionality is the same as in One-Shot Mode.
The fun keeps on coming if you have an MPC style MIDI controller, the notes of the slices map out perfectly to your pads. You can start jamming instantly!
Loop
The Loop Mode is not technically its own mode but is part of the Classic Mode.
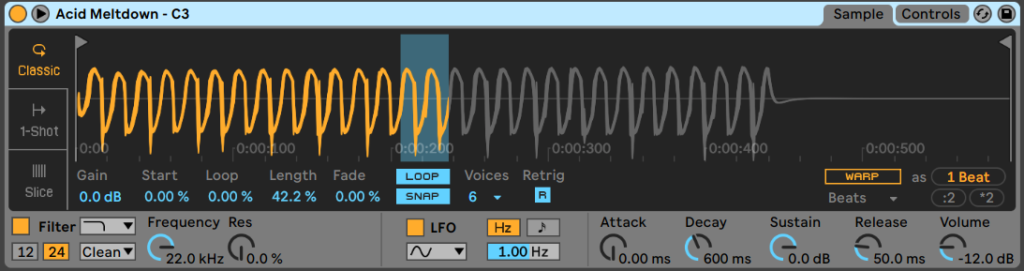
You can use the loop to repeat micro fragments of the audio sample which can be used to create bass instruments or even leads. Usually the smaller the loop fragment the higher pitch the resulting sound will be.
Play around with the Start, Loop, and Length controls to get a feel for how the Loop Mode sounds.
Warping Your Sample
Simpler also has warping functionality so you can pitch your samples up or down without changing the length. Click the “Warp” button to turn on warping and choose your warping method. Beats will produce glitchy sounding playback and Complex Pro sounds pretty clean with most samples.
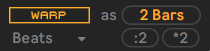
Use the “:2” and the “*2” buttons to either double or halve the tempo of the sample.
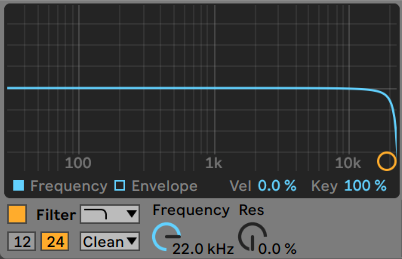
Filter
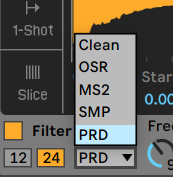
The Filter section of Simpler is straight forward and effective. There are 5 different types of filters: high pass, low pass, band pass, notch, and a morphing filter. The morphing filter adds a control to morph between a low pass and a band pass filter.
In addition to the 5 filter types, there are also 5 types of circuitry patterns you can choose from: Clean, OSR, MS2, SMP, and PRD. Read more about the circuitry types here.
Click the Envelope box and the frequency chart turns into a Filter Envelope. Like the other Envelopes in Simpler, this one is controlled with ADSR parameters.
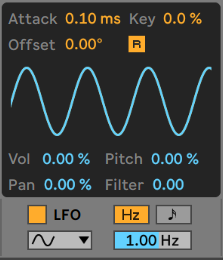
LFO
Simpler comes with 1 LFO which can be assigned to the Volume, Pitch, Pan, or Filter. There are controls to select the shape of the waveform, the speed of the oscillation, and whether or not the LFO syncs with the tempo of the track.
A little LFO on the pitch can help blend notes together making the instrument sound more natural.
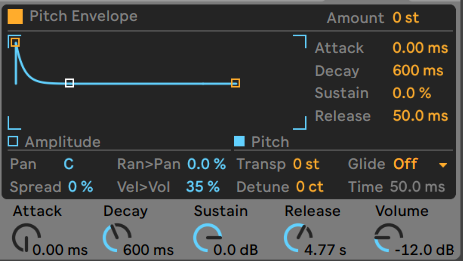
Envelope
Simpler includes a Pitch Envelope for all 3 Modes but only includes the Amplitude Envelope when using the Classic Mode. Both the Pitch and Amplitude Envelopes are controlled with Attack, Decay, Sustain, and Release knobs.
Global Controls
The Global Controls section houses the main Simpler controls like Pan, Spread, Transposition, and Glide.

Pan obviously controls the sounds left and right stereo placement.
The Spread function introduces a second voice of the sample and detunes it slightly for a chorus affect. This produces a wider sounding sample instrument.
Make sure the sample is in tune with your music by using the Transposition and Detune to adjust the pitch of the sample.
The Glide settings are used to pitch slide in between notes. Glide will bend from note to note and Portamento will only bend the notes that are overlapped (played legato).
How To Use Each Mode Of Simpler
Now that we are familiar with the functions and sections of Simpler, let’s take a look at how we can use these tools creatively.
Watch the video below to see how we created these sounds
Classic: How to create your own sampled instrument with simpler
Choose your sample – The first step to creating your own custom instrument is choosing the sample you want to start with. Experiment and choose something random, or be deliberate and choose something suited to your end goal. Drop your chosen sample into the Simpler window.
Tune your sample – Drop a Tuner from the Effects Library after your Ableton Simpler and make sure the pitch of the sample lines up with the note you are pressing on the keyboard. Use the “Transpo” and the “Detune” parameters to make coarse and fine tuning adjustments as necessary.
Shape your sample – Adjust your starting and end points and add a loop if you want to increase the sustain in the instrument. Use the Amplitude ADSR settings to shape your sample even further.
Add some movement – Use the Filter to introduce some movement to your instrument. The LFO can control the pitch, volume, pan, and filter controls allowing you to really get your instrument moving. Likewise, an Pitch or Filter Envelope can help shape the body of your instrument.
After effects – If your instrument still needs something extra you can use effects like Flanger and Phaser to give it some character. Once you’re all done, group Simpler and the Effects together in an Instrument Rack and save the preset.
One-Shot: Using Simpler With Drum Rack
Load up Drum Rack – Super simple, add a drum rack to your current MIDI track.
Choose your samples – Find the kick, snare, hi hats, whatever samples you want to use in your drum track. Drag and drop them onto one of Drum Racks pads. This will automatically load the sample up in an instance of Simpler located within that drum pad.
One-Shot samples – Simpler will usually select One-Shot Mode when samples are dropped into the Drum Rack.
Trim your samples – Use the start, end, and fade settings to adjust the way your sample sounds. If you need further sound shaping you can always switch your Simpler Mode to Classic Mode.
Mix your pads – Once all of your samples are trimmed and shaped, record or load up a drum groove. With the groove playing, use Drum Racks mixer to adjust the levels of each sound to achieve a balance.
Slice: A Simpler way to Flip Samples with a MPC Pad Controllers
Find your sample – Find a good sample that you can use. Look for something with dynamics or interesting sounds or instruments.
Drop your sample – Drop you audio into Ableton’s Simpler and select the Slice function. Simpler will add automatic slice points at each transient in the audio sample. Each of your slices will start at these markers.
Adjust the slice – Move the start of the slice until the sound of the sample plays right where you want it. Do this for as many of the slices as you need to.
Line up the slice – The slices should automatically line up perfectly with the lowest note on your MPC style pad controller. If not you can use the MIDI Pitch effect to line up the slices with your pads.
Start Jamming – Time to start chopping up your sample, play your drum loop and get creative. To help tie everything together you can introduce a tiny amount of reverb and some compression to help tame those peaks. For an old school vibe add some bitcrush or vinyl distortion.
Bonus: Create A Multi Layered Sampled Instrument Using Slice Mode
Record your sample – Record every note of your sampled instrument from the lowest to the highest. You will need to record each note on the instrument chromatically to make this work. Take note of what pitch your lowest note and your highest note are.
Get spaced out – Create a WAV or AIFF file with each of the notes spaced out 1 bar apart. The notes in the audio file should start out from lowest to highest. Export or save the audio file.
Load your sample – Load the sample audio file into Simpler. Then select Slice Mode. This should chop up each of those samples into their own slice. You can adjust the start point of the slice to start at the beginning of the audio.
Tune your instrument – Find the lowest note on your MIDI keyboard controller or within the piano roll. This will likely be C1. Load a Tuner effect from the library and check to see what pitch the lowest note is. Load up a MIDI Pitch effect to line up your keyboard notes with the actual pitch of the notes.
Shape your instrument – Now that you have a playable instrument you can use the Fades, Filter, LFO, and Pitch envelopes to shape the way the instrument sounds. Experiment with everything until you find something unique.
After Effects – If you need something extra you can always use Lives Audio Effects to help tweak your sound. Once you have everything set, group it all together into an Instrument Rack and save the preset.
Ableton Simpler Tips
Below are a few extra tips to help you get the most out of Ableton Live’s Simpler instrument.
Save CPU Power
Simpler can take quite a toll on your CPU, especially if you are running multiple instances in a Drum Rack. Here are a few tips for reducing CPU load from Simpler.
- Disable the LFO if you are not using it, the LFO runs in the background even if it is not linked to anything.
- Turn off the filter if you are not using it, no need to waste CPU on a wide open filter.
- Stereo samples require twice as much processing, if your sound is mono, use a mono sample.
- Reduce the number of voices you have set if you don’t use them all. Set your voices to the max number of voices you use.
- Complex and Complex Pro are heavier on CPU usage than the rest of the warping modes.
Using Ableton Simpler As A Looper
You can use Simpler as a looper by loading up the sample you wish to loop. Select Classic Mode and turn on the loop, then set the start and end points of your loop.
Now to trigger the sample either hold the note on your controller or use a live clip to trigger the loop with a MIDI note.
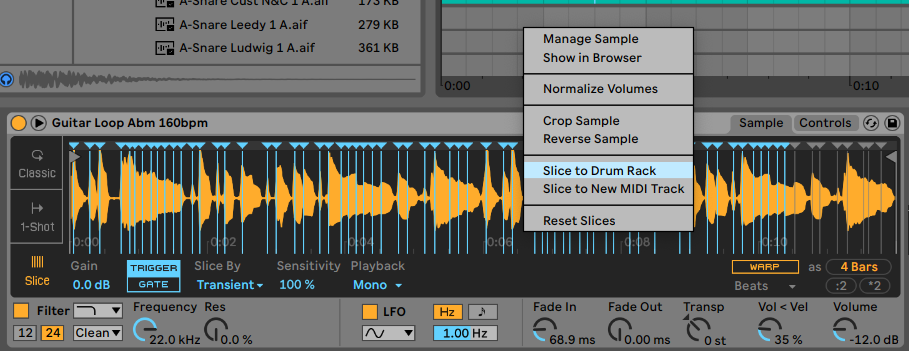
Export your slices to a drum rack
Once you slice your sample up in Simpler, you can export those slices to a Drum Rack. This will produce multiple instances of Simpler and let you process each slice individually rather than all together.
Do do this, simply right click on the waveform in Simpler and select “Slice to Drum Rack”. This will convert the current track to a Drum Rack with all of your slices synced to the pads.
FAQ
Simpler is a lightweight sampler and looper with parameters you would normally find on a synthesizer.
You can find Simpler in the Instrument library on the left side panel.
Simpler can be used in a drum rack to play your one-shot drum hits. It can be used to create your own custom instruments from a single sample source. You can even trigger an audio loop with Simpler while in Session view
Just drop your sample into Simpler, select classic mode, and start playing with the parameters until you find something you like. You can use the filter, LFO, and envelopes to help shape your sound.
Yes! Simpler comes with all 4 versions of Ableton Live: Lite, Intro, Standard, and Suite.
Author: Mike P
Hi! My name is Mike! I’ve been an apartment producer/musician for 10+ years. I’ve played in punk bands, released EDM tunes on Beatport and iTunes, and have a semi-successful stock music portfolio. Read more…