With so much going on, Ableton Operator can be a little overwhelming to a new user.
Operator is Ableton’s native FM synthesis instrument, but it also does so much more. Additive and Subtractive synthesis are also possible thanks to the algorithms within the plugin.
Let’s break it down and take a look at each section of the instrument.
What Is Operator?
Ableton’s Operator is a native instrument plugin capable of FM, Subtractive, and Additive synthesis. The instrument is available with Ableton Suite edition or as an add on pack available from Ableton’s online store.
How Ableton Operator Works
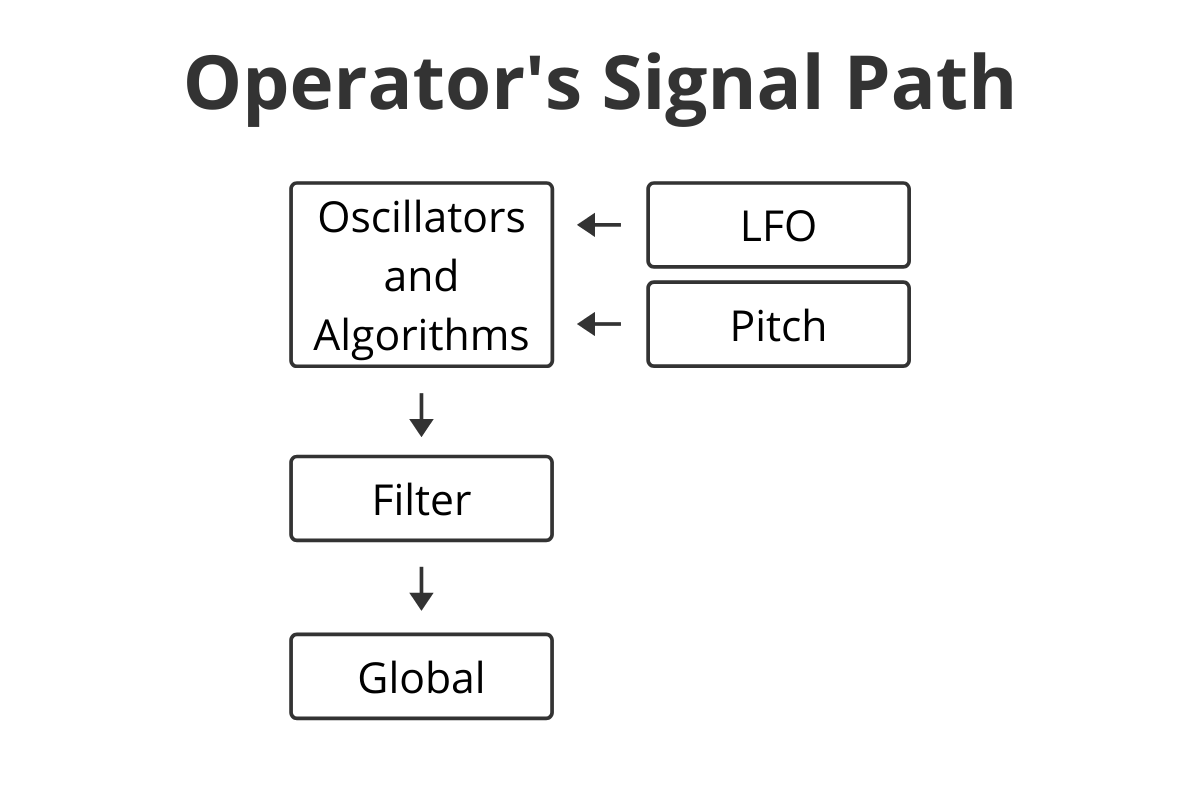
At the heart of this FM instrument are the operators, which are oscillators paired with a dedicated amplitude envelope. Ableton’s Operator has 4 of these oscillator envelope pairings; A, B, C, and D.
These operators can then be “mixed” together using preset algorithms that define how each operator is routed. The algorithms determine which operators are carriers and which are modulators.
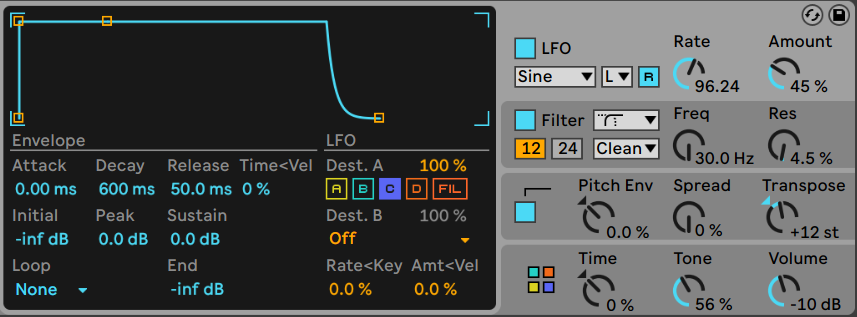
There is also an LFO section that can be used to create more movement. The LFO can be assigned to many different parameters within the operator.
The pitch section is where you will find the pitch envelope and other pitch related settings.
Once the bulk of the sound design is done, the signal is passes through the filter section and then onto the Global section.
The image below shows a very high level representation of how each of the section in Operator interact with each other.
Ableton Operator’s Display and Layout
The workspace in Operator is split into two main views, the Shell, and the Display.
The Display
The display is where you will find the visual representations of the envelopes and filter frequencies. This is also where you will find the more granular controls.
The Shell
The shell is where you will find the most common controls for each section. This is where you will find each sections “on” buttons, volume knobs, and other high level parameters.

Algorithms and Operators
Let’s take a look at how the algorithms and operators work together.
Algorithms
The operator sections can be used to modulate other operators, as used in FM synthesis. The way the operators interact with each other is defined with the algorithms in the Global settings.
While algorithms may seem confusing, Ableton has made it easy for us. Across the top of the global settings display you will see 11 block patterns. Click on a pattern to select the algorithm.
Each of those blocks represents the operator of the same colour. The blocks on the bottom of each pattern represent the carriers and the blocks above other blocks are the modulators.
Think of the blocks as representation of the signal flow from top to bottom.

Reading the algorithms
Using the image above, take a look at the algorithm to the far left, let’s see how these operators work together.
Starting from the bottom, the Yellow Operator is our carrier, this is the operator we will hear. Above is the Green Operator which is a modulator of the yellow box. Waveforms generated in the Green Operator will modulate the waveform of the Yellow Operator.
Following the pattern, the Cyan Operator will modulate the Green Operator. The Orange Operator will modulate the Cyan Operator.
The only audible operator is the Yellow Operator, but the other 3 operators are modulating the sound you hear.
Operators
Operators are our signal generators, this is where the sound starts. Each operator is a waveform generator plus an amplitude envelope.
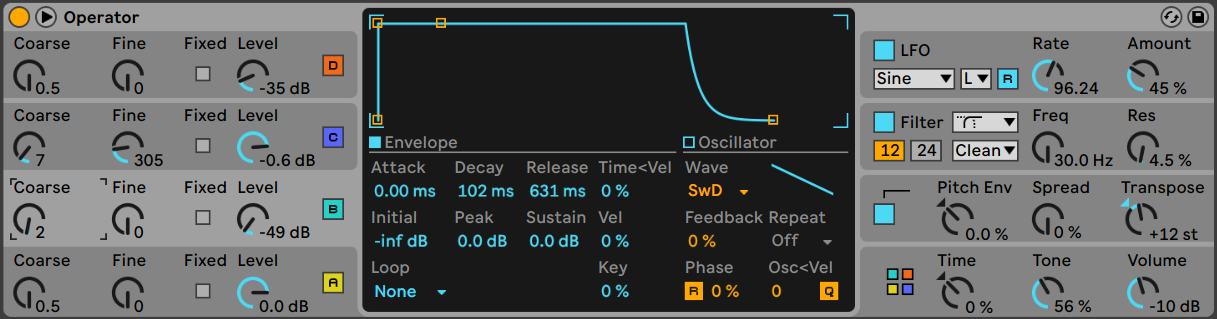
Operators – Shell View
Here you’ll find controls for the tuning and volume of the oscillators.
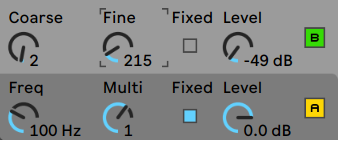
On/Off – The coloured square button on the right-hand side turns the oscillator on or off.
Coarse – This knob sets the octave range of the oscillator, expressed as a multiplier. If we are playing 440Hz and the coarse knob is set to 1, then the output will play 440Hz. When the coarse knob is set to 2, the output is 880Hz. If the coarse knob is set to 0.5, the output is 220Hz.
Fine – The fine knob will tune the oscillator to a note within the current octave as set by the coarse knob.
Level – This controls the output level of the oscillator. If the operator is working as a modulator then the level knob will control the amount of modulation on the carrier.
Fixed – The tuning of each oscillator can be set to either variable or fixed. In variable tuning the oscillator will play the pitch of the notes you play on the keyboard. In fixed tuning the oscillator will play the selected frequency regardless of what note if being played. Fixed tuning is usually best when creating drum sounds.
Freq – This knob chooses the frequency the oscillator will play in fixed mode. Ranges from 10Hz to 2000Hz
Multi – Select higher or lower (mostly lower) frequencies in fixed mode. The Freq knob maxes out at 2000Hz so to get to 20,000Hz set the Multi knob to 10 (10×2000=20,000Hz).
Operators – Display View
The display view is where you will find the envelope and waveform settings.
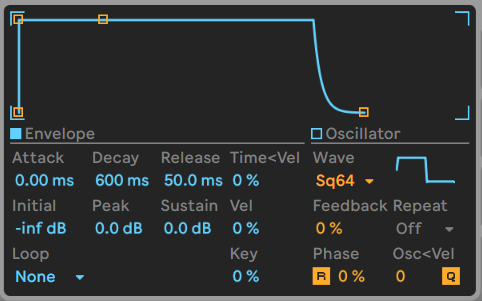
Envelopes
This is where you will find the envelope settings you are familiar with, Attach, Decay, Sustain and Release. In addition there are also controls to set the start and peak level of the envelope.
The Ableton Operator also allows some control over how the envelopes react to different velocities, keys, and time.
Oscillator
The oscillator controls allow you to change the shape of the waveform the oscillator produces.

Clicking the Oscillator box will bring you to the user generator waveform section of the operator. This is where you can use additive synthesis to generator waveforms for sound design.
Experimenting with the waveforms of the oscillators can yield some pretty wild sounds during FM synthesis.
More Sound Shaping Tools
We’re not done yet, Ableton Operator has even more sound shaping tools available.
Filter
The filter section is global and is applied after the algorithms. The filter features an envelope, a shaper with drive, and 12dB and 24dB selection.
The drop down menus allow you to choose the type of filter; high pass, low pass, band pass, notch, and a morphing filter. You can also choose between a clean filter which is based on the same filter as EQ Eight, or an OSR filter which emulates a vintage British filter.

Pitch
The pitch settings also contain an envelope to modulate the pitch of the oscillator over time. You can also select which of the oscillators will be affected by the pitch envelope.
Transposing the pitch of your instrument can be controlled using the transpose knob in the shell view. The Pitch Envelope knob allows you to adjust the intensity of the envelope, using a negative % will invert the values in the pitch envelope settings. Using the Spread knob creates an effect like a chorus by using 2 voices that are slightly detuned.
The pitch section is where you will find the settings to add glide or portamento to your instrument.

LFOs
The Low Frequency Oscillators in the Ableton Operator plugin can be assigned to a variety of controls to provide modulation. The wave shape and intensity can be selected in the shell view, the rate of the LFO is controlled here as well.
The drop down menu beside the waveform select switches between Low Frequency, High Frequency, and Sync. Selecting Low results in normal operation of an LFO. Sync will sync the rate of the LFO to the tempo of your project.
High mode allows you to select frequencies between 8Hz and 12kHz, these high frequency ranges allow you to use the LFO as a 5th Oscillator.
Global Settings
The Global section of the shell is where you will find the algorithm selection panel. This is also where you can specify how your sound will react to the velocity, key, and after touch of your MIDI notes.
You can also set the range of the pitch bend wheel and the parameters controlled by the mod wheel if your MIDI keyboard has those.
Time: This control adjusts the length of all of the envelopes in Ableton Operator, positive values make envelopes longer, negative values shorten the envelopes.
Tone: High frequencies can sometimes be over the top, or sound different depending on the note being played. The Tone control helps tame those harsh high frequencies.
Volume: This one is self explanatory, turn the knob up, the volume of the instrument goes up.

Author: Mike P
Hi! My name is Mike! I’ve been an apartment producer/musician for 10+ years. I’ve played in punk bands, released EDM tunes on Beatport and iTunes, and have a semi-successful stock music portfolio. Read more…