It may not seem like it, but using Ableton’s shortcuts will save you a TON of time. Think of how often you perform a task like duplicating clips or adding new tracks to your project.
Using the menu to complete these tasks usually means 3 steps, right clicking, finding the task you want to complete, and selecting that task. If you go with the keyboard shortcuts then you only have one step to complete, the shortcut.
This article will take a look at some of the most essential Ableton Live keyboard shortcuts available. We’ll also provide handy infographics you can save to help you remember the shortcuts.
Let’s go!
Automation Shortcuts
Who doesn’t love automation? Ableton Live has probably the best automation platform of all of the DAWs. Many people are not aware of the awesome shortcuts you can use to make the most of the automation lanes.
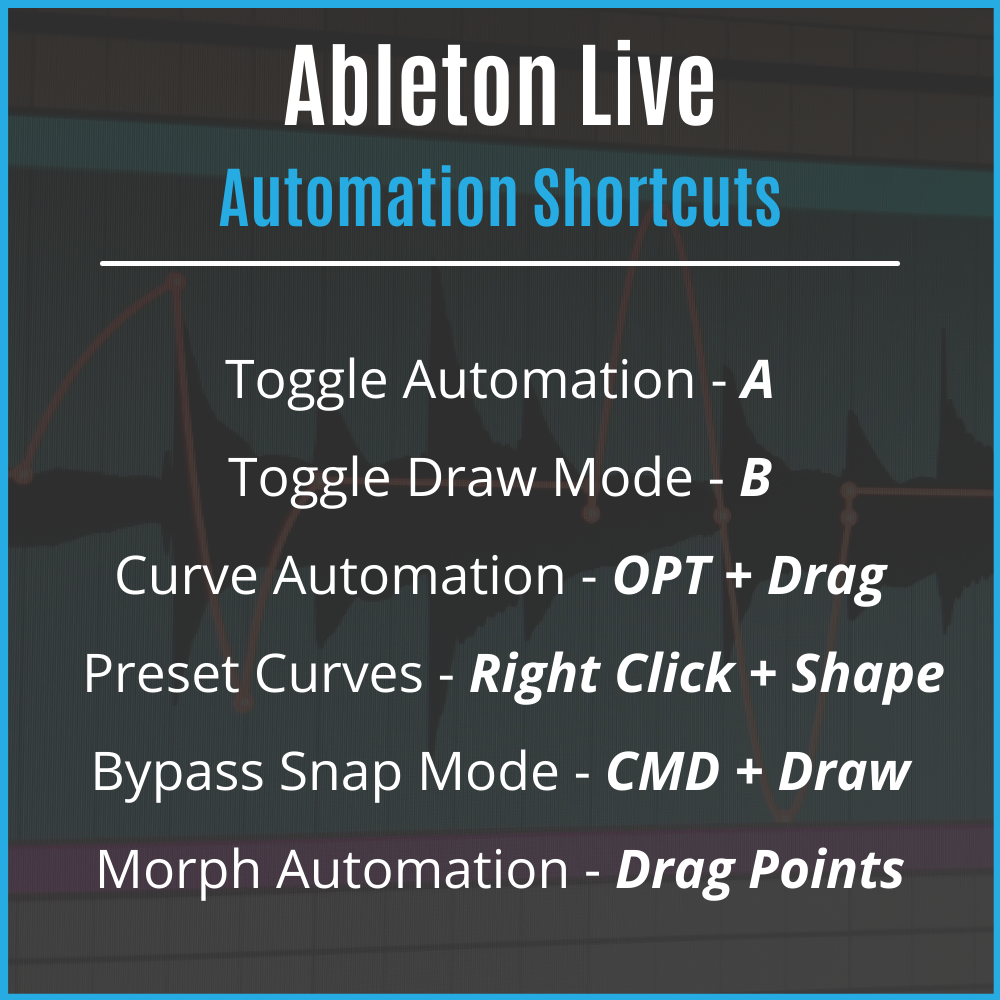
Toggle Automation
A – New to Live in version 10 was the toggle shortcut for automation. Tapping the a key on your keyboard will toggle between automation tracks and clip tracks.
Toggle Draw Mode
B – Automation envelopes can be either drawn in with your mouse or can be set with breakpoints. Tapping the B key will toggle between draw mode and breakpoint mode.
Add A Breakpoint With A Specific Value
Right Click -> Add/Edit Value – This is a super helpful tip that I just learned not long ago. I always struggled with setting my envelopes at the correct value. Usually I would just expand the track view to get close to the value I want.
Turns out, there is a shortcut for that! When adding a breakpoint, right click on the envelope and select “Add Value” to choose the value you want to set your breakpoint at. You can also right click on any existing breakpoint and select “Edit Value” to edit the value of that breakpoint.
Add Curves To Automation Envelopes
OPT + Drag – You can add curves to your automation lanes by holding OPTION and dragging a section of the envelope. Using curves will help smooth out the automation and gives you more control over what you hear.
Add Pre-Defined Curves
Highlight + Right Click + Select Shape – Ableton comes with 10 pre-defined curves you can add to your automation envelopes. Simply highlight the area you want to add the curve to and right-click. At the bottom of the click menu you will see 10 shapes. Click one to add it to the automation lane.
Bypass Snap Mode
CMD + Draw – If you have your grid turned on in arrangement view, drawing an envelope will result in strange stepped shapes. If you want to bypass this while drawing automation curves, hold CMD while drawing. Instead of stepping your drawing the envelope will be drawn smooth.
Morph The Automation Envelope
Highlight + Click + Drag – Ableton lets you morph your envelopes in the automation lane. Highlight the section of the envelope you want to morph and click on one of the dots that appear around the clip. Dragging them around will morph the envelope.
Shortcuts for Clips
Clips are a fundamental part of Ableton Live and there are many shortcuts that make working with clips easier.
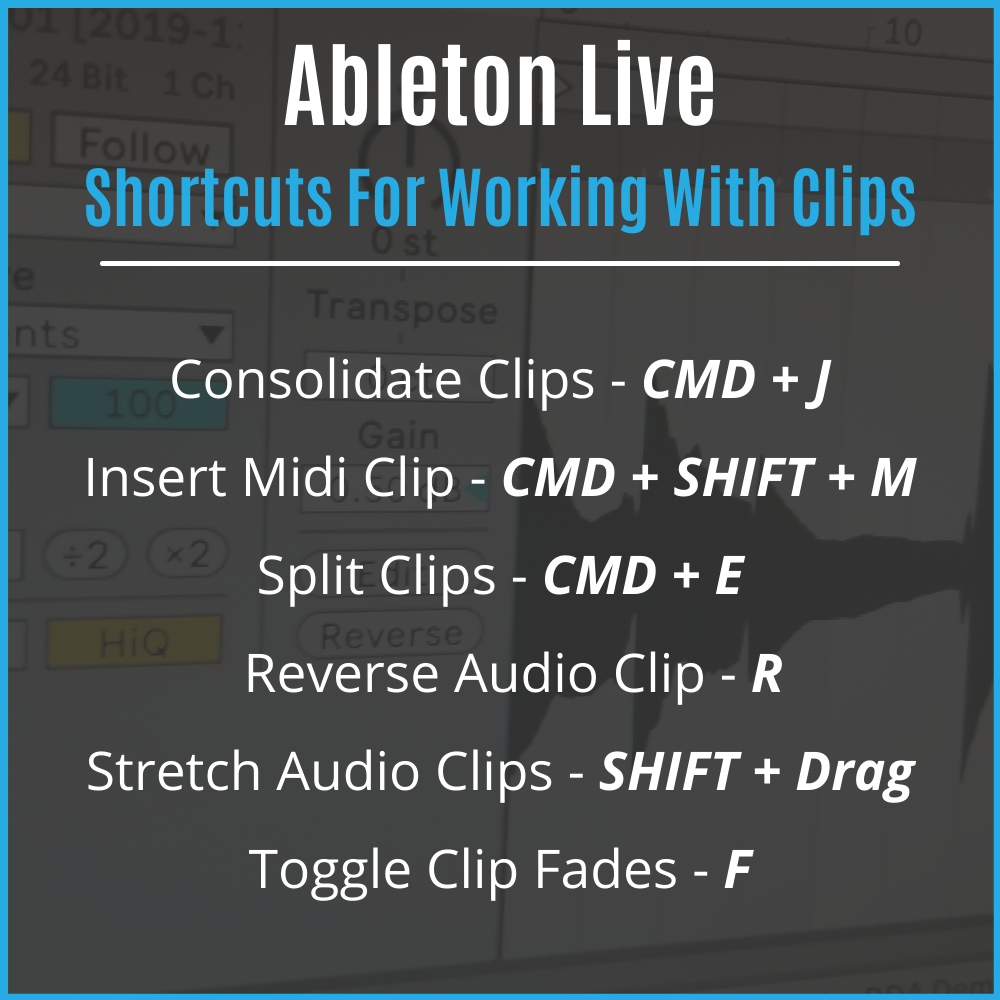
Consolidate Clips
CMD + J – Let’s say you’re chopping up some samples in Live. You want to save your creation as a single wave file so you can move it around easily. Easy peasy, just highlight the area that you want to consolidate and press CMD + J.
You can consolidate clips on multiple tracks too. Just highlight the area and press CMD + J, now there is a new consolidated clip on each track.
Insert A Midi Clip
CMD + SHIFT + M – If you’re using Ableton Live, you’re likely using soft synths as well. That means a lot of notes to write in Midi clips.
Thankfully, inserting a Midi clip is as easy as highlighting the length of the clip you want and pressing CTRL + SHIFT +M. This will insert a new blank Midi clip within the highlighted area you selected.
Splitting Midi or Audio Clips
CMD + E – Splitting clips is made super easy by moving the play marker to the part of the clip you want to split. Tap CMD + E on your keyboard to quickly split the clip.
Reverse Audio Clips
R – I used to spend a ton of time opening the clip view to searching for the reverse button. Reversing your clips with keyboard shortcuts is much quicker. Just click on the clip you want to reverse and tap the R button on your keyboard.
Deactivate Midi or Audio Clips
0 – To quickly deactivate a clip, click on the clip to select it and tap 0 on the keyboard. To reactivate the clip tap 0 again.
Toggle Fade Controls With F
F – Sometimes finding the right fade curve to adjust is tough, holding the F key will show the fade sections of all of the audio clips. This is especially helpful in automation mode.
Stretch Audio Clips
SHIFT + Drag – This is a cool one, you can stretch audio clips by holding the SHIFT key and dragging the end of the clip. An easy way to stretch a sample to fit where you need it.
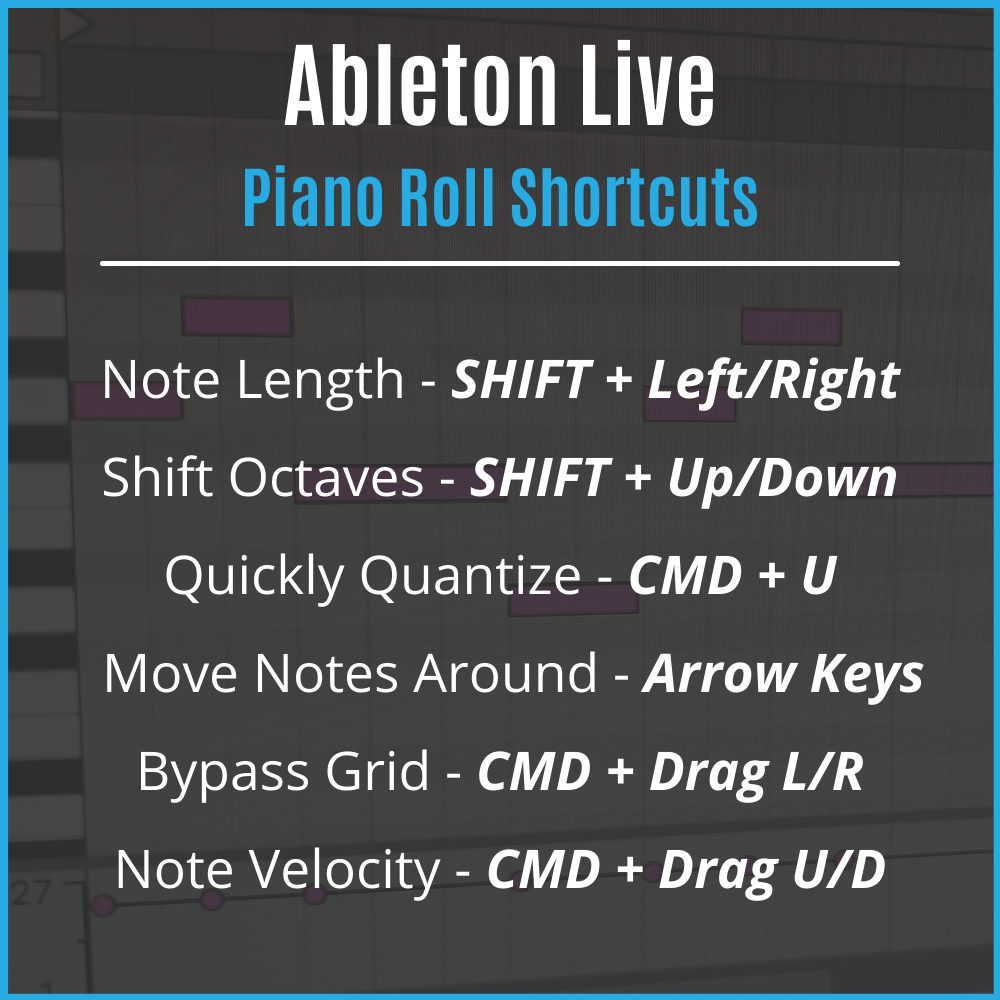
Piano Roll Shortcuts
Working in the piano roll can be a lot easier too! Check out these shortcuts to speed up your composing.
Extend Note Length
SHIFT + Arrow Keys – When composing in the piano roll you can extend the length of a selected note or notes. Hold the SHIFT key and press the right arrow to extend the note and the left arrow to shorten the note.
Transposing Octaves
SHIFT + Up/Down Arrows – Select the notes that you want to shift up or down an octave. Once selected, press SHIFT and then the up or down arrow. The selected notes will be the same musical note but transposed an octave.
Quantization Shortcuts
CMD + U – To quickly quantize the selected notes to the current quantize settings, press CMD + U.
CMD + SHIFT + U – Using this shortcut will bring up the quantize settings window. Once you’ve chosen your settings press OK to apply them.
Move Notes Quickly
Arrow Keys – You can move the selected notes around using the arrow keys on your keyboard. Use the Up and Down keys to change the notes pitch. The Left and Right arrows will move the notes around the grid timeline.
Bypass Snap To Grid
CMD + Drag (Left/Right) – When moving notes around you can bypass the current grid by dragging the note first and then pressing CMD. This will remove the grid lines and allow you to move the note around freely in time.
Change Note Velocity
CMD + Drag (Up/Down) – Adjusting your note velocity is as easy as pressing CMD, then clicking the note and dragging up or down. When you press CMD and hover over the note you should see the mouse icon change to up and down arrows.
Tracks and Shortcuts
Here are some quick shortcuts to help you with your track workflow.
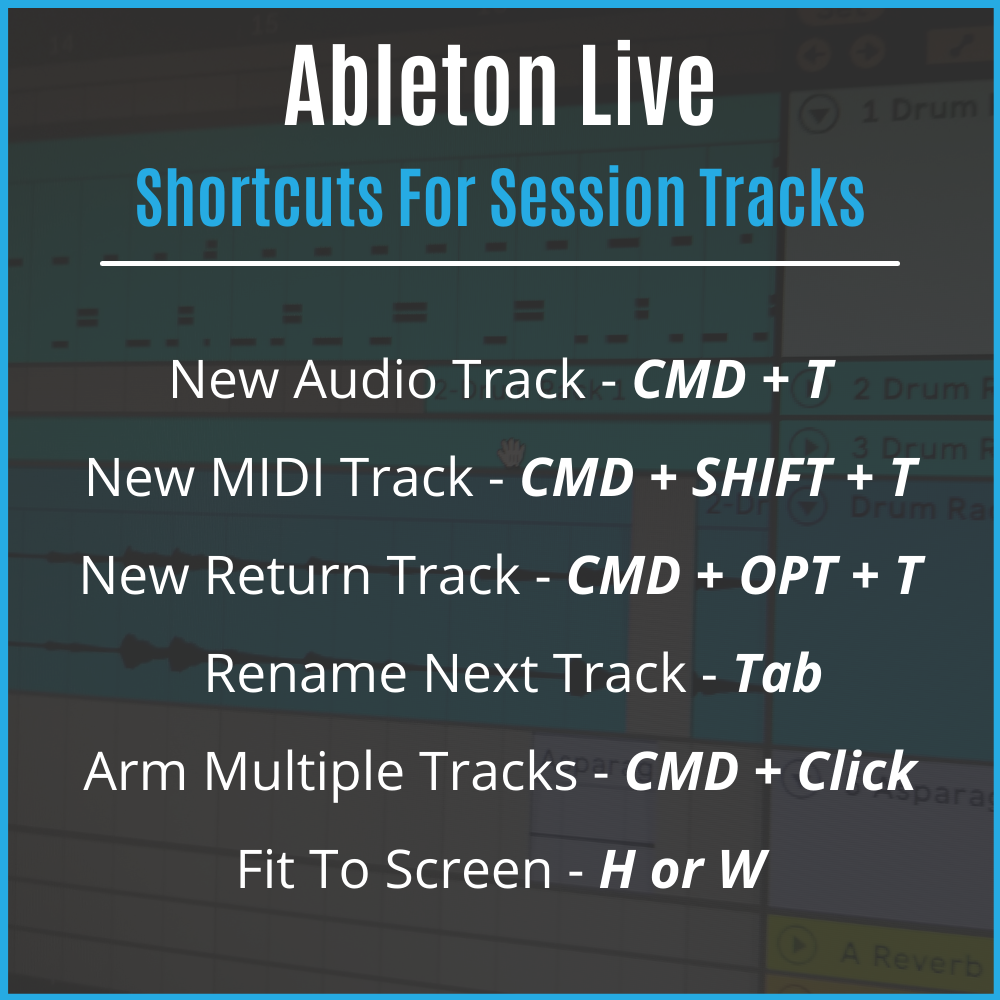
Inserting New Tracks
You’ll always need more tracks, Ableton made it quick and easy to insert new tracks. Follow the shortcuts below.
CMD + T – Use this keyboard shortcut to add a new track to your session.
CMD + SHIFT + T – This shortcut will add a new Midi track to your session
CMD + OPT + T – Using this shortcut will add a return track to your session.
Group Tracks Together
CMD + G – Select the tracks that you want to group together. Press CMD + G on the keyboard and Ableton will group them all together into a Group Track.
Go To Next Track After Renaming
TAB – Sometimes you have multiple tracks that you need to rename. Rename your first track and once you’re done, press TAB to start renaming the second track.
Arm or Solo Multiple Tracks
CMD + Click – To arm multiple tracks for recording or to hear multiple tracks solo’d, hold down CMD and click the buttons on the tracks you want to activate.
Fit Tracks To Screen
H or W – Rearranging and resizing your tracks to fit the screen can be time consuming. Thankfully there is a quick way to do this. Pressing the H key will arrange your tracks to fit the height of the session view. Pressing the W key will fit all of the tracks to the width of your session. Pressing either key again will set the tracks back to the heights they were before fitting to screen.
Author: Mike P
Hi! My name is Mike! I’ve been an apartment producer/musician for 10+ years. I’ve played in punk bands, released EDM tunes on Beatport and iTunes, and have a semi-successful stock music portfolio. Read more…