
You can accomplish a lot with a regular algorithmic reverb plugin. But if you wish to recreate the ambiance of specific spaces you’ll want to start using convolution reverbs.
In this article, we’ll talk about what convolution reverbs are and how best to utilize them in our music production.
This site contains affiliate links to products. The Audio Owl may receive a commission for purchases made through these links.
What Is Convolution Reverb?
A Convolution Reverb is a device that reverberates the input signal like any other reverb. The way it adds reverb is different from a digital reverb that uses complex algorithms.
Convolution refers to the process where one sound source is used as an acoustic model for another. This can be done with both sounds coming from different sources, like guitar and amp sims.
This type of reverb works by using the sonic characteristics of a recorded Impulse Response (IR). The IR is used to add synthetic reverb to the source signal. It gets its name from the mathematical operation it uses to create this type of reverb named “Convolution”.
Instead of using an algorithm that simulates ambiance this reverb uses samples and turns them into a reverb effect!
How Do You Use Convolution Reverb?
To use impulse responses for reverb, you’ll need a plugin. There are many paid versions and a few free versions of convolution reverb plugins.
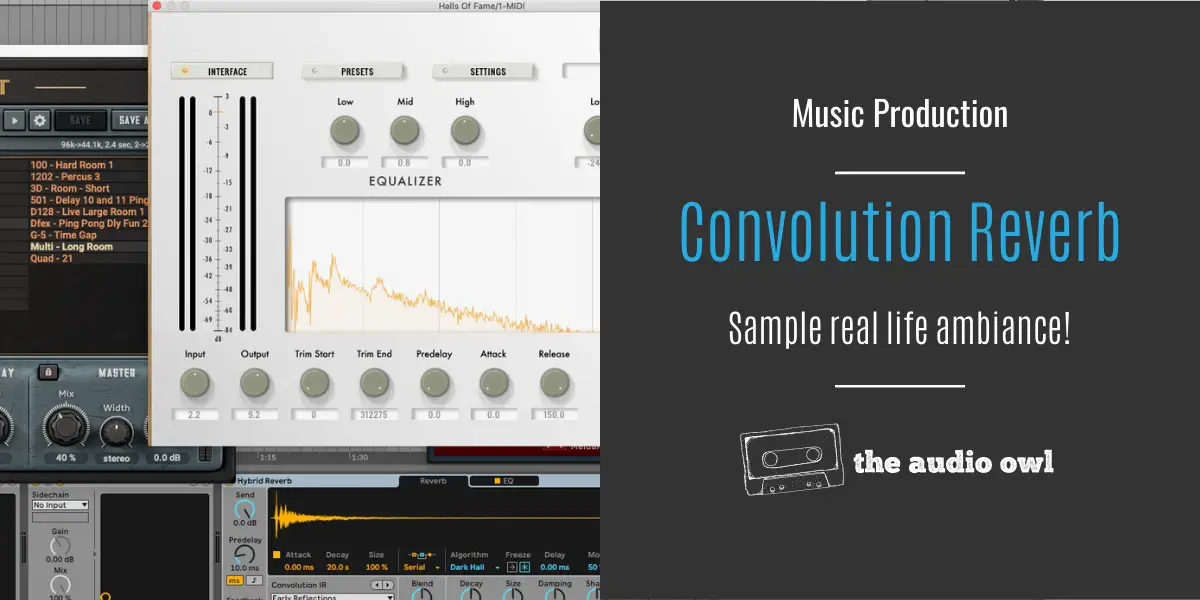
Ableton Live comes with Hybrid Reverb which allows you to choose preset IR’s or load your own. Hybrid Reverb also has an algorithmic reverb that can be combined with the IR. This was a new addition to Ableton Live 11.
Once you’ve chosen your plugin of choice, you’ll need to load up an impulse response sample. After that, the rest is pretty much like setting up a normal reverb plugin. Adjust the Time, Pre-delay, Wet/Dry, and all the other fun stuff you normally would do.

How Is Convolution Reverb Used?
A popular use for convolution reverb is to simulate guitar cabinets. Almost every amp simulator has a built-in convolution reverb unit inside of it solely to simulate guitar cabinets.
It is so good at simulating cabinets that many trained ears can’t hear the difference. Virtual amps are finally beginning to overshadow their tube amp counterparts. All because of convolution reverbs and impulse responses.
But guitar cabinets are just one example of good use of the convolution reverb.
You could make your track sound like it’s played inside your garage or your parent’s bathroom. Whatever place your heart desires has a unique acoustic property that can be effectively sampled into an IR.
What Are Impulse Responses?
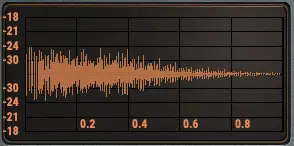
Impulse responses are samples with a sharp, quick, and loud transient. This sample triggers the reverberation of the space you wish to capture. The trigger sound can be anything from a balloon pop to a gunshot. The best IR’s are made with a quick burst of white noise. White noise and frequency sweeps tend to capture the behavior of a wide range of frequencies.
The length of this trigger is typically under a second long, in most cases 0.1-seconds in length. Superfast hits just to trigger the natural reverb of the space.
Impulse Response Sample Packs
It didn’t take long for producers to figure out that they can sample legendary hardware reverb as well. In fact, there are many free Impulse Response sample packs floating around the internet.
You can create a massive library of amazing hardware reverbs for free if you know where to look. I’ve found everything from a 1988 Alesis Microverb to a Bricasti M7 IR sample pack!
Another great use for convolution reverbs is in sound design for movies. Sound engineers will often sample the ambiance of their movie sets so they can easily place sounds for CGI animations. This way any new audio added will sound like it was recorded in the same room.
Here are a few free Impusle Response packs
- Waves Free Impulse Responses (4.9GB)
- Reaper Blog Free Impulse Responses
- A Unique Pack Of IR’s by Fokke van Saane
How To Record Your Own Impulse Responses
To capture an IR you can use your phone, a special handheld recording device like the Zoom H1N, or a microphone.
Professional sound engineers will also use a monitoring microphone so they can hear the reverb. This helps them find the perfect spot to position their recording device in order to capture a perfect impulse response.
But when taking samples for your IR don’t be in a hurry. Position your gear everywhere you can so you can have a wide variety of samples to choose from!
Triggering The Transient
Once you position your recording device it’s time for the trigger sound. As mentioned before a trigger sound can be anything from a balloon pop to a gunshot, but depending on the timbre of the trigger your IR can be colored as well. To record an IR that has all frequencies respectively recorded use a quick burst of white noise because white noise is the sound of all possible frequencies played at once.
A super handy device that can help you with sounding your trigger is a portable speaker.
A pro tip I would also like to mention here is that you can test your IR’s while you are out recording by using a laptop to run your daw and your favorite pair of headphones.
But what if your goal is to record your guitar cabinets or speakers in general.
This time a phone microphone won’t cut it. You would need a nice microphone that covers a wide frequency spectrum like the Shure SM57.
Where To Put The Microphone
Positioning your microphone depends on the timbre you are going for here. If you position your microphone in the center of the cab you will get an IR that is rich in high frequencies and as you stray away from the center you will get an almost low-pass type of sound.
If your goal is to record the center sound of the cab, but you want it to sound a bit muffled you can position the mic a bit further away from the cab and that will mix in some room ambiance that will muffle the highs just a bit.
After you position your mic you need to feed your amp the trigger sound. Connect your daw with a guitar cable to your amp and then play a 0.1-seconds long burst of white noise or you can use a sine wave sweep, but keep in mind a trigger like this would need to go through a process called deconvolution.
In any case, experimentation is always welcome, and positioning your recording device in weird ways will result in interesting sounding IR’s.
Conclusion
Next time you are sitting in front of your daw dialing in a room reverb sound you might want to load up a convolution reverb and throw in your own bathroom impulse response to get a sound that just drives home.
Author: Nadir
Hi there, my name is Nadir aka Nadrisk. I’ve been a bedroom music producer for 8+ years. I do everything in the box and I use Ableton Live as my weapon of choice. Apart from music production, I do mixing and mastering, audio/video editing, and sound design.
Listen to Nadrisk Here
