Ableton Looper’s name describes exactly what it does, it loops audio. Looper allows you to record endless loops of audio to layer over top of other sounds in your mix.
What Is Ableton Looper
The Looper effect allows you to record audio into the plugin and then loop that audio sample continuously.
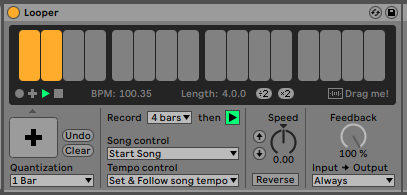
As you can see, there are controls to record, overdub, play and stop the loop. There are settings to specify how long you want the loop to be and there are settings that tell the plugin how you want Ableton to control the song.
Looper can receive audio from both Audio and MIDI tracks in ableton, but the sound you hear coming out of Looper will always be audio. This means you won’t be able to edit the midi notes of the melody you may have played into Looper.
Looper also syncs to the global tempo of your arrangement, you can also set the global tempo of your track with Looper.
The display area of Looper shows you where you are at in the loop while it is playing. There is also transport buttons and BPM / Length information in the display area.
Underneath the display are the Record, Control, Speed, and Feedback settings for Looper.
Looking for free drum samples to use with Looper? Head over to our free downloads page for some free samples!
Let’s take a look at what the Ableton Looper settings can do.
How Does Looper Work?
Looper might seem confusing at first, but once you understand what each setting does you will become more confident.
Setting up Looper
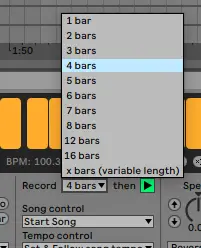
Decide how long you want your loop to be, or let Looper decide based on what you record. Click the “Record” drop down menu and select the loop length you want. If you want Looper to decide the loop length based on what you record, select “x bars”.
Next, select what you want Looper to do once you have punched out. You can set this by clicking the green arrow (or blue cross) beside the drop down menu. This will tell Looper to either play the loop, or to overdub the first recording pass.
Once your length is all set, you will want to tell Looper how you want it to control the global settings.
Control Settings
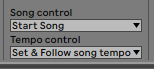
Under Song Control, your selection sets how Looper interacts with the global transport playback. Settings here are either None, Start Song, Start & Stop Song.
- Start Song tells Looper to start the song once the loop is finished recording, when this is triggered, Ableton will start playback of the current arrangement.
- Start & Stop Song links Loopers play and stop buttons to the global transport play and stop. When Looper finished recording the song will play, and if Looper’s stop button is hit, the whole arrangement will stop playing.
- None does not affect the global playback transport at all
The Tempo Control settings tell Ableton how to match the tempo of the arrangement to the tempo of the loop.
- Follow Song Tempo tells looper to match it’s tempo to the track tempo, this may either speed up or slow down your loop.
- Set & Follow Song Tempo means that the global tempo will be adjusted to match the tempo of the loop that was just recorded. The rest of the track will either slow down or speed up to match your loops tempo.
- None selected means that the tempo of Looper is independent from the global tempo. The loop will play in the same time you recorded it.
Recording loops
Recording your audio material is really easy too, the Multi-Purpose Transport Button is where you will do your punching in and out of recording. To start recording, just click the record button.
If your “then” setting is set to overdub, then the Multi-Purpose Transport Button will turn into an overdub button when you start recording.
If the “then” setting is set to play, then the Multi-Purpose Transport Button turns into the play button when recording is started.

When you are done recording your loop, click the Multi-Purpose Transport Button to end the loop.
The Quantization drop down menu will select which point the loop will quantize its start and end points too.
If Quantization is set to 1 bar, then Looper will wait until the downbeat of the next bar when you punch in to start recording.
When you punch of out recording, the 1 bar Quantization will automatically adjust the end point of the recording to the end of the bar.
The Undo button will erase anything that has been overdubbed since the last time the overdub function was engaged.
The Clear button will clear out any audio recorded into Looper.
Speed and feedback settings
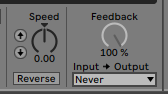
The Speed knob on Looper can yield some interesting sounds and rhythms. Because you are increasing or decreasing the speed of the sample, the pitch of the sample also changes. The arrow buttons a shortcuts to increase the speed by an octave up or down. By increasing the speed to exactly an octave, the sample keeps time but will either be double time or half time.
The Reverse button will reverse the audio sample. If you overdub onto a reversed sample and click the reverse button again, the first recording will play forwards, but the overdub will play backwards.
The Feedback knob determines how much of recorded signal is sent back to Looper while overdubbing. This is useful if you want to fade out an earlier recording. 100% Feedback means the previously recorded material records at the same volume as before. 50% means the previously recorded audio is recorded at half the volume it was the first time. 0% means that the previously recorded material is not recorded in the overdub at all.
Input / Output Routing
This setting controls how the source material is heard over the recorded material. The options are Always, Never, Rec/OVR, Rec/OVR/Stop.
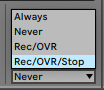
- Always, the input sound is heard over the recorded material and is heard whether or not Looper is playing or recording.
- Never, the input sound is muted and never heard.
- Rec/OVR, the input sound is only heard when Looper is recording or overdubbing.
- Rec/OVR/Stop, the input sound is only heard when Looper is recording, overdubbing, or stopped.
Display settings
The visual display shows how many bars or beats the current loop is. While playing the bars are turned yellow to show which point the loop is being played at.
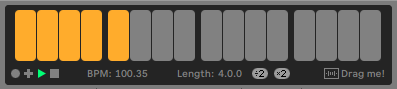
At the bottom on the left are the transport options, Record, Overdub, Play, Stop. Next is the BPM indicator and the Loop Length indicator.
The “x2” button will double the length of the recorded loop. Whatever is in the loop is duplicated to make the loop twice as long. The “/2” button does the same only it shortens the loop, cutting the loop in half and deleting the back half of the loop.
Finally, the Drag Me! icon allows the recorded audio material from Looper to be dragged onto an audio track. Dragging from the icon to the audio track will print out a wav or aiff file of the recorded audio in Looper. This lets you edit the loop and chop it up manually on an audio track. Super cool!
Now that you know how it works, let’s see what you can use Looper for.
What Can Ableton Looper Be Used For?
There are plenty of applications for the Looper plugin, live looping, drum arrangements and adding texture to your tracks are some of the most common.
Live Looping
Ever heard of live looping? Well Looper is the plugin you want if you plan on using Ableton in a live looping environment.
Essentially, live looping is when you layer multiple loops over top of each other. This technique can work with DJ sets, ambient soundscapes and even more types of music.
You can use Sampler as your source sound for loops. Learn how Sampler works plus 3 free plugins that are equally as awesome samplers.
Here is how you might start a live looping set:
- Start with your rhythm loop, or whatever has you inspired. Record and play to set the global tempo to match your loop.
- On another track, record your next loop to a second instance of Looper. Make sure the second Looper is set to “Follow Song Tempo”.
- Repeat.
You could do this with traditional instruments like drums, guitars and keyboards. Or, you could live loop some ambient sounds to create sound scapes and ambience.
Here is a great video explaining how to do this in Ableton Live.
Drum Arrangements
You could arrange all of your drums onto one Looper module, but you lose flexibility with your mix. Since the drum sounds are recorded to the Looper audio buffer, you can’t adjust volumes or EQ on individual drum sounds.
A better way is to add a looper to each pad of your drum rack. That way you can still control the mix of the individual drum sound.

Follow these steps to try it:
- Load a Looper into your drum track and set it up the way you want it. Copy this instance of Looper.
- Paste the Looper copy onto each of your drum pads.
- Map the Multi-Purpose Transport Button of each Looper to a single key or button on a MIDI controller.
Just like that you are ready to record your drum sounds to individual Loopers.
Looking for drum samples to loop with? Check out Ableton’s Selector Kit Preset for Drum Rack. Hundreds of drum samples in one drum rack preset.
Creating Texture and Ambience
Using Looper to create ambience and texture can be quite fun. Basically all you are doing is recording layer over layer of audio into a Looper. You can even set up multiple loopers on multiple tracks.
Your source sound can be anything from your favourite software synth to the metal bowl on your kitchen counter.
Start by recording your source sound into Looper. Once you get it looping and sounding the way you like, start adding more sounds to the layer.
You can audition the sounds before you record them by setting the Input / Output routing to Always. This way you can hear what it will sound like before printing it to the Looper buffer.
Get creative with your layers, use different sounds, add modulation and effects. Ambience and texture is all about experimentation so anything goes here.
Check out what we did with Looper, it’s not the greatest but it demonstrates the technique quite well.
Author: Mike P
Hi! My name is Mike! I’ve been an apartment producer/musician for 10+ years. I’ve played in punk bands, released EDM tunes on Beatport and iTunes, and have a semi-successful stock music portfolio. Read more…