
Have you ever thought to yourself “wow, the timing is all over the place in this audio clip? You’re probably also having a hard time syncing up your drums with the audio clip. The good news is, you can achieve perfect timing by using Ableton’s warp feature.
To warp a clip in Ableton Live, simply open the audio clip editor and turn on the warp button. From there, place your warp markers and move the transients around to fit the timing of your track. You can even set the first beat and have Ableton auto-warp the audio clip for you!
Let’s look even further into the amazing warp capabilities in Ableton Live.
What Is Warping in Ableton?
Ableton Live is a sampling powerhouse and has probably the most advanced time-stretching capability of any DAW. You can import any sample you like and Live is automatically going to enable warp mode and sync it to its BPM. It works much like the quantization for MIDI only in this case it’s audio which is even more awesome!

How Does Warping Work?
Warping works by adjusting the timing of individual points in the audio. You can adjust various points by either manually selecting where the point of adjustment should be or you can have Live do it automatically for you. The points are specified by markers and you can have as many markers as you wish.
To adjust your audio you need to specify a point A and point B marker. The adjustment will start with point A and end on point B. By specifying these points you will have an isolated “sample” of audio that you can then time-stretch. After you specify the desired points you can then shift either point A to adjust the starting point of the “sample” and point B to adjust the length of it.
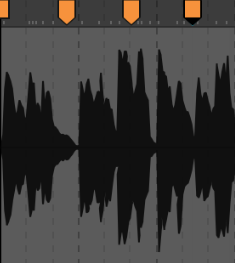
If you allow Live to specify markers for you it will do that by detecting the transients in the audio clip. Live will add point A and point B markers by determining where the transient hits and where it fades out.
As Live finds out where the transients are in the audio it will also mark them with “pseudo markers”. These markers aren’t active and if you wish to activate them all you have to do is a double click or drag them and an actual warp marker will appear.
Warping Modes
Warping is a non-destructive way of editing audio which means that it preserves the pitch, timing, and formant of the original audio. It does this unlike any other daw and it lets you choose in which way you want to preserve these details.
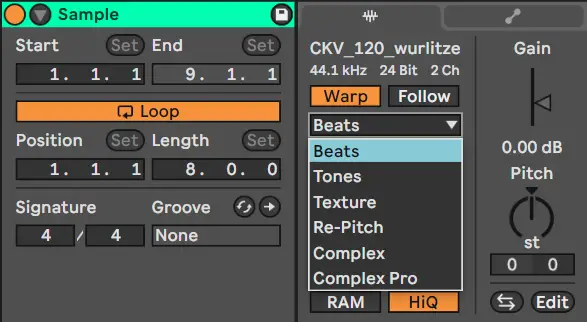
There are six warp modes to choose from:
- Beats
- Tones
- Texture
- Re-Pitch
- Complex
- Complex Pro
Beats
The beats mode is a good option for percussive samples. It can keep the transients intact and it won’t degrade the quality of the individual sounds.
When in beats mode you have the “Granulation Resolution” drop-down menu which lets you choose between a number of fixed note values and a transients mode. To get the most accurate results you should use the transients mode, but if you want to preserve specific beat divisions choose one of the fixed note values.
What I found super useful in this mode is the “Transient Loop Mode” and the “Transient Envelope”.
The transient loop mode offers you the ability to choose how your transients will play through in the warp mode. You can choose to turn off the loop mode so every transient plays to its end or you can choose between one of the two-loop modes.
Then you can fine-tune how quickly your transients fade with the transient envelope. This function works like the decay of an envelope filter.
You can get some really tight percussion sounds if you turn off the transient loop mode and lower the transients envelope.
Tones
This mode is good for tonal samples like vocals. Tones mode offers you the ability to tune the “Grain Size” which is a great way to avoid distinct artifacts in this warping mode.
Texture
This mode is good for polyphonic or noisy samples. Texture mode has a unique flux parameter with which you can get some creative and interesting results.
Re-Pitch
This mode works similarly to a tape recording. Re-Pitch mode will speed up or slow down to match the global tempo. Keep in mind that this mode won’t retain the pitch because as the global tempo slows down so will the pitch of the sample go down and vice versa.
Complex
This mode is designed to warp complex samples like multitrack recordings eg. full mixed songs. There are two versions of the complex mode and this one is like a “lite” version of the “Complex Pro” because it uses less CPU power.
Complex Pro
This mode is the same design as the “Complex” mode, but with the addition of the “Formants” and “Envelope” parameters.
The Formant parameter compensates for the formant changes that can happen in this mode and at 100% it fully preserves the original formants.
The Envelope parameter affects the spectral characteristics of the sample. Lower values work great with high-pitched samples and larger values work well with samples that are lower in pitch. As a general rule, the envelope works well with most audio when left at 128.
What is the quickest way to Warp a clip?
Warping in Ableton Live is as easy as dragging an audio file and dropping it inside of the daw.
Once you load the file Ableton Live will automatically warp the audio inside the audio clip.
Most of the time Live will get the warping right automatically, but if you aren’t satisfied you can always manually edit the warping or warp the audio from scratch.
If you wish to warp the audio from scratch you can disable the warp mode and enable it again which will reset all the warp markers to just the first one.
Then you can start adding new warp markers and choose the right Warp Mode for your sample.
Conclusion
This article covers a lot of information about the amazing Warp mode inside of Ableton Live. You can use it as the stepping stone for your future sampling and editing. If you want the technical details behind warp, check them out over at Ableton.
Author: Nadir
Hi there, my name is Nadir aka Nadrisk. I’ve been a bedroom music producer for 8+ years. I do everything in the box and I use Ableton Live as my weapon of choice. Apart from music production, I do mixing and mastering, audio/video editing, and sound design.
Listen to Nadrisk Here
